
Welcome to my first tutorial on the Super Spectacular Stashtacular month of stash busting, no fabric buying, Flickr posting, giveaway giving Stashtacular extravaganza.
This whole month is going to be Fancytastic [/fan-see-tas-tik/]; (adjective): Class and elegance without the snobbery. A flair for style while maintaining the fun (1).
Are you ready???? Don't forget to grab the Stashtacular button, and to join the Flickr group so that you can be eligible for Stashtacular giveaways during and at the conclusion of Stashatcular on August 5th. As you can see from the opening button that there are 3 blogs hosting this month long event. You must go visit Jenna at Sew Happy Geek and Kelly at Blue Bird Sews, BECAUSE if this is the first time you are hearing about the Stashtacular, you have already missed 2 fun-filled fabulous days!
Ok, on to the {S}hexie headband tutorial. Despite it's name, this stylish headband is suitable for girls of all ages.
 |
| You try and photograph a moving subject. She wanted the headband but didn't want to pose for a picture…... |
For this {S}hexie Headband Tutorial you must decide whether you will make your hexies from paper, or plastic (you know I have heard that somewhere before……). If you are using paper, you can go here and print out sheets of hexagonal graph paper and cut them out yourself, or here and get them pre-cut. Or you can purchase plastic hexagonal forms at your local quilting and sewing stores, or make your own from sturdy card stock, or yoghurt container lids (not my idea, but a good one).
There are great hexie making tutorials out in the blogosphere- here are some great links:
SewMamaSew- hexies, Amy Gunson- PDF instructions. Please check these out before starting this project if you are new to making hexies.
{S}hexie Headband Tutorial Materials: (These all came from scraps from other projects- remember, we're not buying anything new this month)-
1" hexie graph paper (you may make your hexies in any size you choose- however you will have to adjust the pattern to give you your desired overall length if you work with a bigger or smaller hexie).
small scraps of fabric in coordinating colors and patterns
fusible double-sided peltex
elastic, 1/4", about 6.5" for each headband
thread, sewing machine
You will need to make 14, 1" hexies for this project (adult/teen) size, 12 for a child size.
From the hexie template (graph paper or plastic), trace the 1" hexie shape onto 7 pieces of your double-sided, fusible Peltex.
 |
| Tracing from the 1" paper templates onto the Peltex |
 |
| Just before cutting out. |
Cut out Peltex hexies.
Using your scraps, choosing ones that will give you 1/4"-1/2" extra all around your Peltex template, iron onto one side of Peltex (having a teflon ironing sheet beneath the Peltex while doing this will keep your project from becoming a part of your ironing board cover). Then fold the little edges over as if you were going to baste-sew your hexie. (The glue on the Peltex will hold the fabric in place). DO NOT cover the entire back side of the Peltex with fabric, we need some of the sticky on that side too.
Make 7 of these (Peltex hexies) and set aside.
Using your paper/plastic template, make 7 additional hexies in the usual manner (remember we need 14 total for the adult headband and 12 for a child size headband).
Now, taking the Peltex fused hexies, place a conventionally made hexie (minus its paper/plastic form) and lay it over the back side of the Peltex hexies (wrong sides together), align your edges and iron into place.
Repeat for all 7 of your hexies.
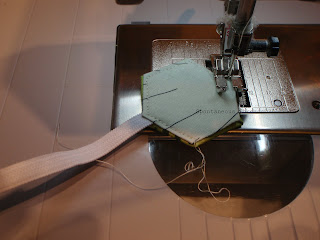
Take your now fabric 2-sided Peltex hexie to your sewing machine and carefully and as close as you can, sew around the edges of all 5 of the pieces, making sure to catch the edges of both hexies, reserving 2 hexies to attach the headband elastic. (see picture one below this one for where to sew).
For the 2 remaining hexies, take the elastic and carefully insert about 1/4" between the 2 hexies and attach elastic as you sew around the edges. These 2 will be the "bottom" of the headband (the part either under your hair or by the back of your neck).
Line up the remainder of your 2-sided hexie pieces as you would like them to eventually be in your finished headband.
Using the elastic/hexie piece as the starting point, add each additional hexie point-to-point until they are all attached. I used satin stitching to attach each hexie to it's neighbor, but just as easily, stitching back and forth with a straight stitch could be used, or by hand with embroidery thread if that's where your talent shines. If you have done an excellent job with your sewing, your headband is reversible! (that's a surprise, just because you did this project). If you don't have enough fabric scraps to make a reversible headband, muslin could be used on the back side of each hexie, but, seriously, don't we all have so many scraps that this shouldn't even remotely be a problem?? And if is a problem, remember to enter our scrap swap, as part of this Stashtacular month of fun.

When you are done, put your {S}hexie headband on and get ready to receive compliments.
(1). {excerpted from Chevy Malibu ad, Martha Stewart Living, July 2011}.
Using your scraps, choosing ones that will give you 1/4"-1/2" extra all around your Peltex template, iron onto one side of Peltex (having a teflon ironing sheet beneath the Peltex while doing this will keep your project from becoming a part of your ironing board cover). Then fold the little edges over as if you were going to baste-sew your hexie. (The glue on the Peltex will hold the fabric in place). DO NOT cover the entire back side of the Peltex with fabric, we need some of the sticky on that side too.
 |
| make sure you leave enough fabric to cover the edges of the Peltex but not the entire back-side |
Make 7 of these (Peltex hexies) and set aside.
 |
| The before (left) and after (right). The sticky on the double-sided Peltex holds the fabric edges in place. |
Using your paper/plastic template, make 7 additional hexies in the usual manner (remember we need 14 total for the adult headband and 12 for a child size headband).
 |
| Paper pieced hexies, bottom row |
Repeat for all 7 of your hexies.
 |
| Peltex fused hexies, ( right side forward), top row. Paper-pieced hexies (right side forward, except 1), bottom row. |
 |
| Just before sewing, Peltex hexie on left, Paper pieced hexie on right. Take the right hexie, place it wrong side to wrong side and iron to Pextex hexie, making a cute hexie sandwich. The little bit of exposed Peltex will hold the 2 pieces together nicely until you sew them. |

Using the elastic/hexie piece as the starting point, add each additional hexie point-to-point until they are all attached. I used satin stitching to attach each hexie to it's neighbor, but just as easily, stitching back and forth with a straight stitch could be used, or by hand with embroidery thread if that's where your talent shines. If you have done an excellent job with your sewing, your headband is reversible! (that's a surprise, just because you did this project). If you don't have enough fabric scraps to make a reversible headband, muslin could be used on the back side of each hexie, but, seriously, don't we all have so many scraps that this shouldn't even remotely be a problem?? And if is a problem, remember to enter our scrap swap, as part of this Stashtacular month of fun.

When you are done, put your {S}hexie headband on and get ready to receive compliments.
 |
| My second attempt at trying to photograph a moving subject….. |
(1). {excerpted from Chevy Malibu ad, Martha Stewart Living, July 2011}.
This turned out so cute! Hexies are addicting, something about those 6 sides :) Great tute you fancytastic lady, you!
ReplyDeleteGreat tutorial! I'll have to see if I have some of that Peltex laying around!
ReplyDeleteHow cute! Savi's working on a pile of hexies right now - I bet she'll want to use them for this instead of a mug rug now! :)
ReplyDeleteJust published my post linking to ya. Yay!
Super cute,I think one of these is going into my daughters stocking this year! :)
ReplyDelete