Tuesday, November 28, 2017

I am Mighty Lucky

December is my month- come learn all about "Pulling from the Past" right here. Members just sign in, or you can join for the month!

I will be giving away the 2 mini quilts featured in the projects section. You have to be a Mighty Lucky Quilting Club member to win. Stay tuned for details. It's not too late to join in on the fun.


When you are sewing along and creating, please make sure to tag your makes #mightylucky and please tag me too @spontaneousthreads

Have fun!

Sunday, July 16, 2017

Improv Blog Hop Winner


Brenda your comment was chosen by Mr. Random for the Improv Blog Hop Giveaway!!!

"I really enjoyed your post on this lovely quilt. I have never considered using wool and it is a fantastic choice, especially for the car. So thank you for enlightening my quilting fabric choices. I have to have something to drink in the car and always have a gallon of fresh water available. Have a great day! "

You are the lucky winner of  a curated FQ bundle of Amy Friend's Improv fabric.  I've sent you an email with further details. Congratulations!!

Tuesday, July 11, 2017

{I am} Along for the Ride


I was honored when Amy Friend (During Quiet Time) asked me if I would create something with her new Improv fabric line by Benartex.   I wanted to do something unexpected, knowing that I was also under a bit of a deadline. After receiving my Improv fabric my original idea flew out the window. The  fabric patterns I chose are modern prints but also read as solids from a distance. That alone solidified the idea that became my project. I did need one other ingredient.


I high tailed it over to Denver Fabrics and after much deliberation, purchased a lovely Italian 100% merino wool; a gray and cream herringbone. Not going to lie, it was expensive, but incredibly soft, light weight and will be very warm. I chose this particular wool because it was the perfect compliment to my selection of colors from Amy's gorgeous Improv fabric line.  My Improv palette is decidedly feminine with raspberry, lime and shades of gray with the dominant print reading as white/off-white. The contrast of a lovely, soft wool with the fresh, feminine prints was exactly what I wanted.


I chose as my project, a car quilt- the perfect hybrid of both quilt and blanket.  (My husband smiled at this- the irony of making a hybrid car quilt specifically for my hybrid car was not lost on him).  This quilt is modern and fun while also being soft and warm. To make the perfect modern car quilt you need 2 things:  a fun pieced modern quilt top design made with Improv cotton fabric (one side)  and soft and warm merino wool on the reverse.

The pieced cotton top is simple and bold, showcasing 9 of the fabrics from the Improv line: (from left to right) Patches (White/light gray), Twisted Screen (Citron), Beans Crosshatch (Citron), Molehills (Citron), Triangle Toss (Deep Rose), Patches (Rose), Triangle toss (dark Gray), Twisted Screen (Gray), Beans Crosshatch (Gray)


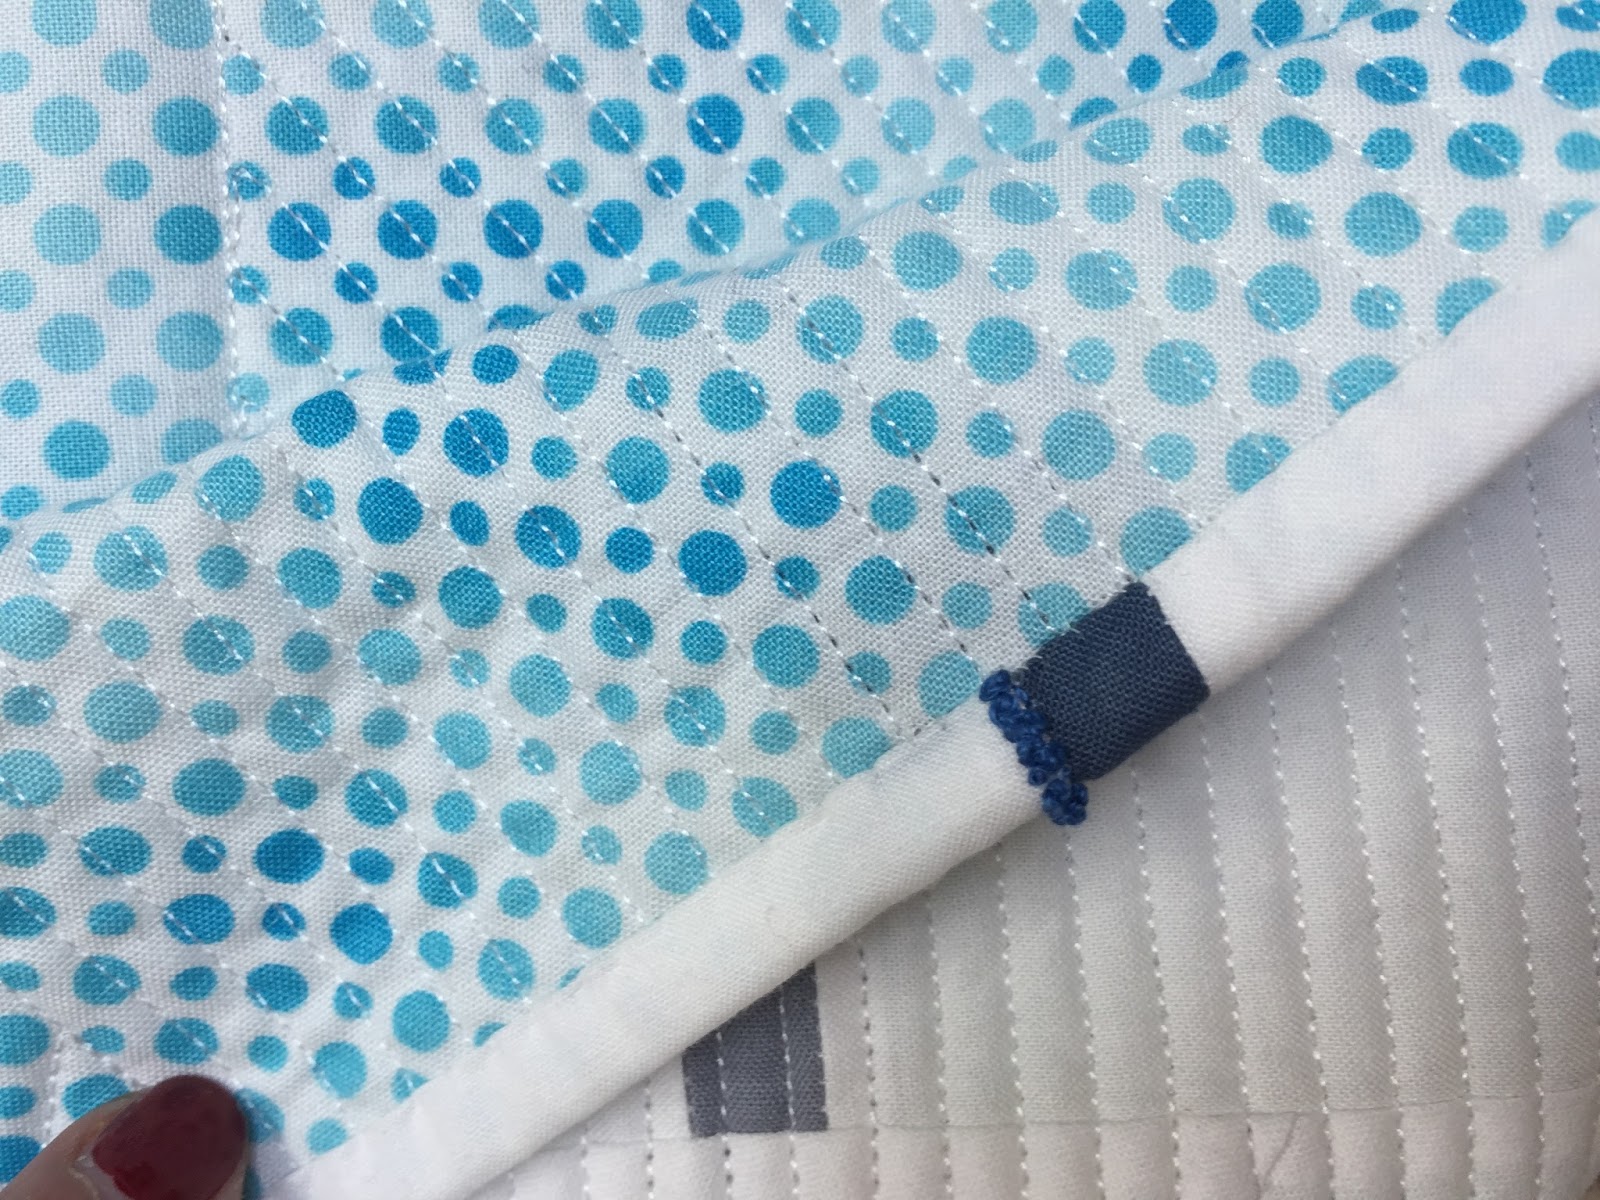
Simple, straight line hand quilting was accomplished with 6 different colors and 2 different types of thread keeping the inherent softness and drape of this quilt. Most of the thread is 12 wt Sulky 100% cotton quilting thread in off white, 3 different light to medium grays and one pale celery green.  The 6th thread is Coats and Clark  retroreflective Signal Thread (large cone in photo below). This last thread is a strategic addition to this quilt. The inherent reflective qualities of this tread combined with the fabrics make this quilt not only warm but also safe.

Any light (say incoming headlights) bouncing off the quilt will immediately make the quilt visible in the dark. Depending on the circumstances, this quilt could save your life. (That's the best endorsement for making a car quilt, in my opinion).

Before going into the nitty-gritty remember this is a week long blog-hop. Here is the line-up.

Wednesday: Sharon @Color Girl Quilts
Thursday: Charise @Charise Creates
Friday: Nicole @Wild Boho
Saturday: AnneMarie @Gen X Quilters

The hybrid Car Quilt details:

"Along for the Ride"
Soft and wrinkly after washing.
The top and bottom fringe are a nod to its "blanket" roots.
60" x 60"
Top: Original design, pieced top using 100% cotton "Improv" Fabric by Amy Friend for Benartex.
Back: 100% Italian wool, pre-washed (see notes below) and fringed.
Because the wool has loft, nearly all of the stitching is invisible on the back. 

Hand quilted, from the back (using the herringbone's linear registration lines as guide lines for the hand-quilting), using cotton and reflective threads.
The retroreflective Signal thread reads "white"  ( photo taken with flash on).
The thread is light gray in daylight.


Machine washable, line dry.

Think about making one of your own? I'm certain that many of us have the necessary materials already in our sewing rooms.

A (not really a tutorial) Tutorial:

Materials:
1. A finished quilt top made with soft and beautiful Improv fabric. This fabric is versatile and a perfect choice for many patterns including one of your own making. If you keep your car quilt to 60" x 60", fitting the backing fabric will be easy, especially since most garment wools are 60" wide.  For my top, I used the 3 gray FQ's for the left side and 1 1/2 yards of the white/off-white fabric for the remainder of the top. Sewing the FQ along their short side made a pieced section the same length as the single piece of Patches (white/light-gray). I then drew 3 elongated oval templates and traced them on the quilt top as shown in the overall photo. Using the technique discussed here in an earlier blog post, I added the 3 greens in descending color intensity (using a FQ of each color). Finally, I used the same smallest oval template to add the 2 raspberry highlights. This quilt has only 14 seams on the top, and can easily be pieced in a day.
2. Backing of your choosing, keeping in mind  natural fibers like wool shrink when washed. The backing doesn't have to be merino wool, it could be cashmere, or fleece. A woven wool makes lovely fringe, but a boiled wool would also work. Selecting a natural fiber for the back that is durable and warm is the whole idea behind this hybrid car quilt, as the backing fabric takes the place of the batting and  cotton backing of a traditional quilt.
3. Sewing machine, thread, scissors, misc. sewing supplies.
4. Wash and dry your backing especially if your using a natural fiber like wool. You can block your wool, after washing to square, paying special attention to the parallel finished edges.
5. Trim square the 2 cut edges on each end of your backing fabric.
6. Stitch 1" from each cut edge and then gently unpick the weave to create fringe. If you don't want fringe you can skip this step, but I think the fringe really makes this the hybrid quilt/blanket that you'd want for your car.
7. Lay the back out on a flat surface, wrong side up and lay the top over the back, right side up.
8. Pin baste.
9. As carefully as possible fold under the raw edges of the top so that it covers the back, leaving just a little of the finished edges and all of the fringe, pin with straight (garment) pins.
10. Stitch top to back along outer edges, removing straight pins as you go.
11. Hand quilt or tie your top to the back to retain softness and drape with thread of your choosing. There are some wonderful specialty threads out there including wool, glow in the dark, solar reactive and retroreflective. Think of all the fun you can have just figuring out what thread to use.
12. IF you decide to quilt your car quilt by machine,  lengthen your stitch and use a walking foot. Skip steps 9 and 10 above and start by quilting top to back leaving at least 1" of all the outer edges un-quilted. Tuck in the raw edges of the top after trimming to size and then complete step 10. If you have chosen a simple linear quilting design like me, the edge stitching, anchoring the side edges of the top and the back, will compliment the overall design eliminating the need to go back and finish any further machine quilting.


I can't think of a better was to finish this post than with a generous give away by Benartex celebrating this new and lovely Improv fabric line by Amy Friend.

GIVEAWAY
  • One winner will receive a curated fat quarter bundle of a selection of some on the prints in the Improv fabric line.  Each blogger is giving away a FQ bundle, so please make sure to visit each and follow their rules for eligibility.
  • To be entered to win, you need to leave a comment here on my blog. Tell me the one thing in your car you couldn't do without. 
  • The giveaway is open till July 14th at midnight. Winner chosen at random on July 15th and announced here and on IG (@spontaneousthreads)
  • If you comment make sure I can contact you if you win. Failure to do so will result in another person being chosen as a winner. If you are a no-reply blogger please your email address and IG handle in your comment.
  • Anyone can comment, but only US residents can win. 


Note:
**** I purchased 6" more wool than the finished size for my final project. Because car quilts get dirty and need to be washed , I pre-washed and air dried the wool fabric to guarantee that I wouldn't have to commit to a future of dry-cleaning. It's risky doing this with dry clean only fabric, but I've done it in the past with success-  this time, I lost about 4" overall due to shrinkage. If you want to consider something other than wool for the back, keep in mind that it's hand will affect the drape and warmth of the overall design. There are no wrong choices!

If using a woven wool, after the wool fabric dried, it was squared up and I carefully stitched a tight straight line 1" from each cut edge and picked out the cross woven gray fabric to create cream fringe.


Saturday, July 1, 2017

Reds, White and Blues WINNERS!!!!!

THANK YOU to everyone who left comments on the #paintbrushstudio Patriotic Palette Blog Hop!
Random number generator picked 2 winners.
Betsy will be receiving the 7 FQ bundle from PaintBrush Studios and Grammajudyb will getting my collection of 2.5" squares and a variegated spool of hand quilting thread. I have sent you both emails so please check your mailboxes and get your email mail addresses to me ASAP! Packages mailed out after the 4th.

Have a safe weekend everyone and enjoy your holiday celebrations.

Tuesday, June 27, 2017

A Salute to the Red, White and Blue


Welcome to day 3 of Paint Brush Studios 4th of July Patriotic Palette Blog Hop.
I will be hosting today so keep reading because there is a giveaway (or 2) at the end. If you've already been following along, you can see projects on IG @paintbrushstudio look for #pbstudio #painterspalettesolids and #RWBsolids.

As some of you know I have been lucky enough to be able to participate in several Paint Brush Studios events, including their March Madness bundle challenge and now, this. Some of you also know, that these solids are my favorite brand, hands down the softest hand of the quilting solids I have had the opportunity to use. 


You may also know, that besides quilts, I sew garments and to me, seams are an elevated art form. 

  • [SEAM] noun- 1. the line formed by sewing together pieces of cloth, leather, or the like. 2. the stitches used to make such a line. verb- 1. to join with or as if with stitches; make the seam or seams of.
  • taken as a whole, seams are as varied as quilt blocks with fun names to match (bias, flat fell, French, Hong Kong, inset, open welt, picot, piped, top-stitched, etc.)
  • and as a design element: seams are absolutely essential to good construction.
I knew immediately that I wanted to use the 7 Painters Palette solids to try out a seam that doesn't immediately jump to most peoples mind, by making a quick, modern, versatile, patriotic, 2-sided project that could double as a banner or a table topper and that can be made in what ever size you like. 


For my project, you have to meet the lapped-felled seam. (Like quilt blocks, some specialty seams  are identified by several names). I like this particular combination as it really identifies the 2 basic components of this technique,  lapped seams, followed by felled seams. 

I'll walk you through the process but first you'll need to gather some supplies:
Fabric: I used 7 FQ in the following colors: White, Patriot, French Blue, River, Claret, Crimson and Tomato.

Thread: I went with a top stitch (28 wt) weight on the top, color matched to the background segment I was working on and Aurifil 50 weight 2021 in the bobbin.
Glue for basting
Iron and water bottle for spritzing (or starch, or Flatter)
Heavy weight paper (for triangle template)
Ruler, rotary cutter, washable marking pen

Ready? Set? Go (create)
1. Make a template. I made my triangle 10" wide by 6" tall. Please note that the 2 sides abutting the base have squared corners instead of pointy ones. You will see in the next steps why this is necessary. Those squared corners are 1/2" high. Because this "pattern" can be personalized, you can make your triangle template any size you choose, making your project uniquely yours. 


2. Trace your triangles (using your sturdy paper template) onto the fabric you chose for those triangles. (Here, white). Trace as many triangles as your design calls for. I used 6. Cut out your triangles and put them aside.


3. Using your triangle height as a guide, cut a strip of fabric the width of your desired finished piece plus 2" by the height of your triangle plus 2" (for me, 22" wide (the width of a FQ) by 8" high). (The extra height will be necessary giving you some wiggle room when you trim). Then, place your triangle in the center of your background fabric strip and cut along the left side, using the edge of the triangle as the cut line. (This photo shows the cut background fabric aligned with the center triangle before any ironing or sewing. By lining things up before hand, you can organize your segments  making it easier and quicker to iron, glue and then sew.

4. Take your triangle to the ironing board and iron a 1/2" fold, pressing to the FRONT of the triangle. See how nicely those squared corners line up at the triangle bottom. 

5.  Iron a 1/2" fold to the BACK of the right side background fabric (red in this photo). The remaining background piece  should match the left side of the triangle if you are doing things correctly. (This is where lining things up in step 3 really speeds things along).

6. Nest the pieces into each other as shown.  Placing the right side of the triangle and the right side of the background piece together allows the folded seam allowances to overlap, with the seam allowance of the triangle covering the cut edge of the background piece. (This is the first past of lapped portion of the lapped-felled seam). Put a little glue between the nested red and white 1/2" seam allowances , iron to set glue and keep things in place.


7. Fold the red background piece over the white triangle and re-iron the ironed background fabric seam allowance. I recommend at this time, pulling back the red background fabric and adding a little glue to the top of the nested white triangle fabric- and setting the glue by ironing again.  This extra glue basting keeps all the layers in place without letting them move. If you choose not to to that, it still works, I just like the assurance of another glue basted seam.  (Now both raw edges are covered and the 2nd lapped part of the lapped-felled seam is complete). 

8.  Take your freshly glue basted and ironed piece back to your cutting surface and trim the background fabric using the left side of the white triangle as your guide.

9. You will see if you've done everything correctly, you will have one background piece left that is exactly cut to finish the left side of your triangle. 

10. Repeat steps 4-7 to complete the left side. Trim segment at top and bottom

11. Now, the fun part..... take your glue basted triangle/background to the sewing machine where you will sew 2 seams (This is the felled portion of your lapped-felled seam). One seam should be sewn very close to the Triangle background and the other just less than 1/2" away.  The goal is to catch both lapped edges with these 2 seams. I used a matching red thread on the top  (Front: full and detail)
               

and white thread in the bobbin (Back full and detail)


12. Repeat making segment "blocks" until you have the desired number of blocks all stitched and trimmed.  You attach the linear segment "blocks" to each other with the same lapped-felled seam technique as was used to prepare each segment "block".  I decided to alternate reds and blues, moving from lightest to darkest as I went.

13. Finish the outside edges with your favorite mitered-corner technique (there are so many). Deep blue fabric showcases the mired corner from the back-side of the finished piece. Because of the construction seam choice the piece is finished on both sides and is reversible.


Since both sides of this piece are finished it is ready to use once your mitered edges are done. The seam detail is truly worth the effort and makes a beautiful image with the light shining through. (Have I mentioned I have a thing for seams.....??). 
  
Other reasons I wanted to explore this seam detail further, is, it is another way to construct projects using the Korean technique of Pojagi. I took a class a few years ago but struggled with the repeated trimming and back and forth ironing and sewing, as well as constantly having to pay attention to joining the 2 pieces (because with the traditional pojagi technique, one side has one seam showing and the other 2 seams showing). In the end I was not happy with the visual quality of my seams. Since Pojagi is reversible, you can't hide the seam detail- it's all about the seam! By using a lapped-felled seam you can glue baste all your seams first, then sit down at the sewing machine to construct your segment "blocks", without having to worry about what side of the piece your working on.  Once the segment "blocks" are done, you then can rearrange them to your liking before sewing them all together in a finished piece, again without worrying about the sidedness of the seams. 


Yes, this technique has quite a few steps, but it is so worth the extra effort. Once you make your first block the others go quickly! Depending on the size of your triangles and the width of your background fabric the possibilities for  customization are endless. You can add more than 6 segments. You could add less. You could join side segments to make this bigger...... you can also use this seam technique to construct a multitude of other gorgeous projects including, but not limited to, curtains, scarves, clothing, and summer quilt/throws. 

I hope todays tutorial has given you a few new things to consider and I hope if you explore this seam, you'll share your projects with me, on IG @spontaneousthreads use #seamsmodern

As promised....... and because you made it this far.

The GIVEAWAY
  • A winner will receive 7 fat quarters in the colors used in the Patriotic Solids blog hop. Each blogger is giving away a FQ bundle, so please make sure to visit each and follow their rules for eligibility.
  • To be entered to win, you need to leave a comment here on my blog, letting me know what your favorite 4th of July activity is.
  • The giveaway is open till June 30th at midnight. Winner chosen at random on July 1st and announced here and on IG (@spontaneousthreads)
  • If you comment make sure I can contact you if you win. Failure to do so will result in another person being chosen as a winner. If you are a no-reply blogger please your email address and IG handle in your comment.
  • Anyone can comment, but only US residents can win the FQ bundle. 

BUT, there is MORE......
I made a little 2.5" charm pack of the left overs from my project. (see photo). I will send a second luck winner this charm pack and some fun variegated hand quilting thread just because. The same rules apply (see above), BUT this is why everyone should comment- I will happily ship this little gift internationally if that's how Mr. Random number generator see things lining up.

So, good luck everyone!

PS: Just in case you missed any of the blog hop, here's a list and the dates they are participating. And you really should go and see everyones posts, remember there is inspiration and fabric on the line.


6/26: OP Quilt
6/27  YOU ARE HERE
7/3:    Peas in a Pod

Monday, June 5, 2017

2 Degrees Celsius

3 words (2 Degrees Celsius) and a story.


A very long time ago, our universe, and in it our planet became a reality. Echoes today whisper of tension, change, competition, famine, extinction, survival, cooperation, love, hate, war, peace. 

Fast forward a bit to January 2017 and this post. I encourage everyone who has the time, to listen to the embedded TED talk and to re-read the blog post for January's Resolution #beesewcial prompt. It's rather timely.

As the pieces of this quilt arrived in Denver from my friends,  and I began to assemble their blocks into a cohesive whole, this quilt became something more than I originally intended. You can certainly go to each #beesewcial quilters IG post and read about their blocks. Their stories are personal and profound. In their togetherness, however, the impact of each piece resonated.
 (rez-uh-neyt: verb 1. to produce a positive feeling, emotional response, or opinion). 

The addition of rather exceptional machine quilting (thanks to Christine Perrigo) and her nod to creative spaces, I took the time to meditate on the quilt as a whole, to construct a thoughtful binding and then to add hand stitches to the quilt that celebrates the process of coming together,  creative collaboration, and of love of our planet and our fellow (wo)man.

Title: 2 Degrees Celsius

70" x 66"
Bee Sewcial blocks by: Leanne Chahley, Karen Foster, Felicity Ronaghan, Marci Debetaz, Silvia Sutters, MR Charbonneau, Debbie Jeske, Anne Sullivan, Hillary Goodwin, and me.
Materials: Quilting cottons, t-shirt material, glass nano particle fabric and embroidery floss in an arctic color palette.
100% wool batting
Original quilting design by Christine Perrigo using Fil-Tec Glide, trilobal polyester thread. Additional hand stitching details using Sulky 12 wt cotton threads in complimentary colors.

Pieced, 2" SOG binding with embellished details.


Close-ups of additional details: details are purposely subtle and often hidden. This quilt, like our planet requires close inspection, and time to see everything worth seeing. 


Saturday, June 3, 2017

Bindings: Love 'em or Hate 'em


I seems to me that feelings around quilt bindings fall into broad 2 categories: people either love them or they hate them, and these deep feelings don't seem to be associated with whether bindings are attached by machine or by hand.
There have been some wonderful polls about how people attach bindings to their quilts. I fall squarely in the Team hand binding. If I'm attaching a binding to my quilt, I sew it to the quilt front by machine and finish it on the back, by hand using a blind hem stitch. I have evolved over time from a simple binding person to someone who gives as much thought to the binding as I do to the quilt design.  I LOVE this part of quilt making; let me tell you why.
I see the binding as the last bit of quilt design, a chance to sum up the totality of my work. It certainly isn't the last hand stitch that will grace my quilt, as the label and the hanging sleeve all require hand-stitching, but bindings allow for a bit of creativity that can have a big impact.
In my quilting career I have worked with both bias and straight of grain bindings, preferring a 2" straight of grain binding to all other. I ventured into traditional faced bindings and "skinny" faced bindings. I have embellished and quilted bindings (by machine and by hand), fussed over 2-sided matched bindings, and spent hours on intricately pieced bindings. The one thing all my bindings have in common is that I wait until I am completely done with my quilt before deciding on what kind of binding I will use. Sometimes the bindings are simple, other times they have taken all day to assemble.
I have been fortunate to received judges comments on the some of my quilt's bindings (always positive), validating, in some small way,  the amount of time I spend on them.
Below is a gallery of some of those bindings. Perhaps you'll find some inspiration in there for your next project.

Example: Color Blocked Binding cut 2" SOG (quilting by Christine Perrigo). In this quilt, this piece of turquoise was the only are of color that would touch the binding so it seemed more than appropriate to continue the color out into the binding. Because my bindings are cut at 2" they do not add to the overall measurements, keeping the proportion of the turquoise square the same.

Example: Inset binging cut 2" SOG, left photo used nano particle retroreflective fabric. These inset strips are less then 1/4" in width.
Inset seams bindings


Example: Pieced binding cut 2" SOG, pieced as I attached the binding for more precise placement)


Example: Quilted Binding (machine). After making the binding and folding it in half, it was heavily quilted using different colored threads. After quilting the binding is attached in the usual manner.


Example: Embellished/ quilted binding (hand). In both instances the hand work occurs after the binding is attached to the quilt. 


Example: 2-sided binding (also quilted). This quilt was a challenge in that the quilt was 2 sided, one side white the other black. It posed a problem for picking a color for the binding. The solution was a 2-sided quilted binding. The thread on the black fabric is metallic and standard cotton on the white side.