http://www.spontaneousthreads.blogspot.com/2011/10/starburst-tutorial.html
MODERN ART PLACE MATS
Part 1- fabric selection, cutting and piecing the top
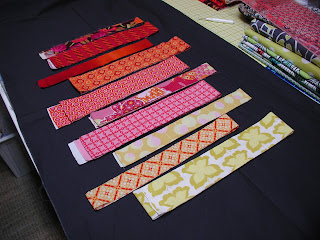
I was inspired by Made on Maple's Picket Fence Pillow. I used their take on this great scrap busting technique and added a twist of my own. Unfortunately, instead of busting my stash, I actually had to find a few more fabrics that I wanted to use. Luckily, I'm planning on making at least 8 place mats, so in the end I should use all the material I purchased. Let me back up a wee bit. I took the Hand Made Pledge this year and so set in motion a series of handmade gifts that I am going to accomplish in 2011. I have family sprinkled all over and several of us this year have BIG birthdays. So, out came the thinking cap and with some helpful hints from my sister-in-law, I am making my brother-in-law some Modern Art Quilted Place mats to go along with a yummy, seasonal, eat local, organic cook book- he loves to cook. My launching point for color was a piece of art they have in their kitchen. I haven't actually seen this piece of art but was told it's pink and orange and yellow.
So, for 4, 18 x 14 place mats you will need the following materials:
1. 2 yards of a solid color fabric of your choice. (About 1 yard will be used to piece the fronts and the other for the solid backs).
2. 1/4 yards of at least 7-10 coordinating cotton fabrics in colors and patterns of your choice.
3. batting of your choice but not too fluffy- these are going to be place mats (I like 100% organic cotton)
4. rotary cutter, ruler, thread, sewing machine, iron, ironing board
 |
| Cut strips on background fabric |
Based on your preference, start sewing strips to one another using a 1/4 inch seam allowance and staggering the strips as you like. Press each time you attach a strip (open or to the side- your choice). Trim ends to roughly 15 inches (we will square up the finished block to a finished measurement of 14 x 18 inches). You can keep adding the pattern fabric/solid fabric strips to comprise the entire top or add interspersed solid strips. It is really up to what you want these to look like when they are wide enough.
 |
| cut patterned and background fabric strips |
 |
| version 1, pieced top |
 |
| version 2, pieced top |
 |
| version 3, pieced top |
 |
| version 4, pieced top |
The end result is that each pieced top is a little different, but not so different. I extended the width of the top to get to 18 inches by piecing additional pieces of the solid background in different widths. As already mentioned, you can omit the solids and just use your patterns- personal preference reigns supreme here. After ironing all tops- trim to 14 x 18 inches. (Keep that in mind the final measurements when you are piecing your strips together so you don't end up chopping off some lovely strips mid-piece).
I entertained using 100% linen on the backs of these place mats, but after washing and ironing, I think, I'm going to get more of the Kona solid I used to piece the top. (Also, I found an awesome fabric to use as the binding- but you'll have to hold your horses for a day or two to find out what it is).
As much as I can, I will let you know my color palate. (I must make a confession, however, and a wee bit of an apology to the fabulous designers out there). I buy fabric because I like a particular pattern and color combination and, up to my 1st purchase of a jelly roll this year, I have never purchased pieces, even in fat quarters, of a whole collection. I often buy fabric but do not use it right away. So, some of my fabric, (especially the fat quarters and skinny 1/8 th's), don't have the helpful identifying makers marks along the selvedge edges, because I either have cut it off, never got it, or got the piece between the info. If I can ID a fabric I will, if not, perhaps some of you more learned will recognize my stash and fill me in. Either way, it doesn't take away the fun of having all this cool fabric to work with, it just adds a bit of mystery to the final project- and who doesn't like a little mystery in their lives?
The next tutorial installments will deal with the quilting and the binding. Keep tuned!
