Sunday, July 31, 2011

What I have been up (down) to…….

My sewing space is in the basement, so even though things have been busy in the sewing room I have to descend the stairs to get to my creative space.  I just finished by first round in the Pretty {little} Purse Swap. It's so inspirational and there are some really talented sewists out there in blogland. I have already sent and my partner received her pounch. I'm still waiting to receive mine, but while I wait I had a few birthdays/projects I had to attend to:

Leeden's 14th birthday tote bag


Katie's 18th birthday purse

interior, I found the sew in style difficult and the interior stitches not so complimentary. With normal use you don't see the stitches because you have a different view looking into the purse, but I know they are there. (I like the interior fabric however).

My 16-teen year old son- off fishing with Grampa and needed a bag for all this plugs, chargers and phone "stuff". (I truly love him asking because 1) he's a boy and 2) he still needs me to do stuff for him. ) I thought the plaid was "manly" enough and it was scraps left from last years flannel PJ's.  I tried to match the plaids, it would have bugged me otherwise. The handle is nylon webbing.

Side view, the stitching from elastic interior loops to hold pens and pencils for summer AP prep "homework".
and lastly, one for me (although my 13-teen year old keeps saying how much she really likes it).  Made from scraps  left from a quilt (in the flimsy stage) - Moda sugar popscraps and Kona ivory- solid. 

Saturday, July 30, 2011

The give away is HERE!!!!


Stashtacular


I have been looking forward to this for, 3 weeks!!! My give away day. A $25.00 gift certificate from 1choice4quilting. First, my thanks to 1choice4quilting for generously donating to the STASHTACULAR give-aways. Go on over and give them some consumer love at the end of the STASHTACULAR.

OK, drum roll…….
The winner of one $25.00 gift certificate, from 1choice4quilting, chosen from among all the wonderful and creative comments this week is……….

 CK who said: "This has been a *perfect* month for Stashtacular! We have had 1 day in July under 100 degrees, so I have no desire to pile all the kids into the hot car, walk across the hot parking lot, and listen to 3 hot and sweaty kids whine while I look at fabric. And since we have pretty much barricaded ourselves inside, I have gotten to use up quite a bit of my hoarded fabric. So thank you for the motivation, inspiration and 
way to avoid perspiration! ;-)"

Also, a winner from among the funniest comments I got (it may or may not have had anything to do with sewing or the STASHTACULAR), is

Allison who said: I could use another shopping bag. Will have to put that on the list. 
About me...well I live in Boston (weather here has been nasty!) and I drive a scooter. On Saturday I got pulled over. Not the first time I ever got pulled over, but the first on my scooter and it was so embarrassing! Stupid me projected my speed and the distance wrong for a turn and cut off an undercover cop in a pickup. Oops. I really appreciated all of the gawkers in the cars and the pedestrians that stopped to watch the show. That made me feel better about the situation. NOT! At least I got off with a warning even if I lost a little of my dignity. 
Thanks for the giveaway.

I noticed a real theme with the comments, nearly all had hot, hot weather happening in their neck of the woods, and many seized the opportunity to stay indoors and sew!! (Me too). I will send Allison a charm pack from my stash - Moda Awesome by Sandy Gervais.

So, lucky winners, you need to contact me to get me your information (address and preferred emails) so that we can get your gift certificate and charm pack prizes on their way to you. CK- you in particular because you are a no-reply blogger. Congratulations Ladies!!!

Friday, July 29, 2011

Stash post update- does it really look like I've made progress


Stashtacular


Looks can be deceiving! I really have made a dent in my stash, it's just so hard to tell because there was so much stash to begin with. It does feel good to be a whole 3 weeks (and counting) without buying any new fabric. I have mailed in my scrap swap packages to Jenna and Kelly (over 4 pounds to each of them- I probably shouldn't have said that, but I got on a roll and cleaned out my sewing area).  I can't wait to see what's coming my way, although I HOPE both Jenna and Kelly exercise some restraint and send me far less in return. I mean who doesn't love getting an envelope with fabric in it???? I do, I do, I just want less, rather than more fabric, which only means some of you will get more than you sent. YAY!!!
In addition, while scrap searching, I cleaned and rearranged and emptied out 3 plastic storage boxes of fabric- yup, here is the proof

3 empty boxes and 2 envelopes of scraps- although I eventually upgraded to boxes as the collection grew and grew! Some of the additional scraps are around on the table if you look closely.
But hey, today, I'm really just hear to brag about others- taking something common place (the laundry) and elevating it to a new level. After this I might be inspired to keep up with the laundry or not- at least either way my laundry room will look nice!


1. Fabric Boxes, 2. Fabric Boxes, 3. Fabric clothes hangers for girls, 4. Clothes hangers for baby boys, 5. laundry bag, 6. Violet's Laundry Bag, 7. Custom Laundry Bag, 8. Custom Laundry Bags, 9. Clothes pin keeper tutorial, 10. Monster Clothes Pin Bag - Blue, Diamonds, Green eyes

Give-away tomorrow, Give-away tomorrow! (Don't forget)

Thursday, July 28, 2011

Inspiration in line with a clothes pin keeper


Stashtacular


Get it??? "line" , clothes pins huh, huh……??? Hope so anyway.
Well, it's the end of week 3 and so many of you have done some really great things with your stash. If you haven't yet grabbed the STASHTACULAR button, it's still available, so go ahead and grab it and put it on your blog!
As many of you devotee's of SATSHTACULAR already know, I have posted some pictures of my stash on our Flickr page. If you haven't seen it, well, here goes

scraps


stash

So, go post pictures of you sewing room mess stash and see how you size up. remember, all that STASHTACULAR Flickr sharing is contagious.
My secret wish goal for today is convince you to add to your accessories for the laundry room. The perfect thing to "go" with your new clothes pin keeper. There are some great ideas out there starting with a few from the lady who had been hand crafting for quite some time, Ms. Martha Stewart. I was hoping to score an interview with Martha, but alas she's probably busy, making cheese from her heirloom sheep herd while simultaneously shearing the sheep, carding, spinning and knitting all that yummy yarn into her Christmas gifts for this year. So, next best thing was the July 2011 issue of her magazine featuring a few sewing projects (hers made from bandanas- and NO you cannot copy that idea UNLESS you have bandanas in your fabric stash). Oh, FYI, I have red bandana fabric (yes, yes, I do) in my stash, but I really wanted something with a bit more pizzaz for my projects, so here goes……

Martha's  Clothes Hanger Covers. "These are easy to make, so you can create multiples for a matching set". (That is sooooo Martha). OK Martha-we shall see now, won't we. (I have added additional comments to the sewing and construction where I think necessary).

Materials for this project:


Metal Hangers (who doesn't have these at home)

Fabric from your stash
Sewing machine, thread, imagination


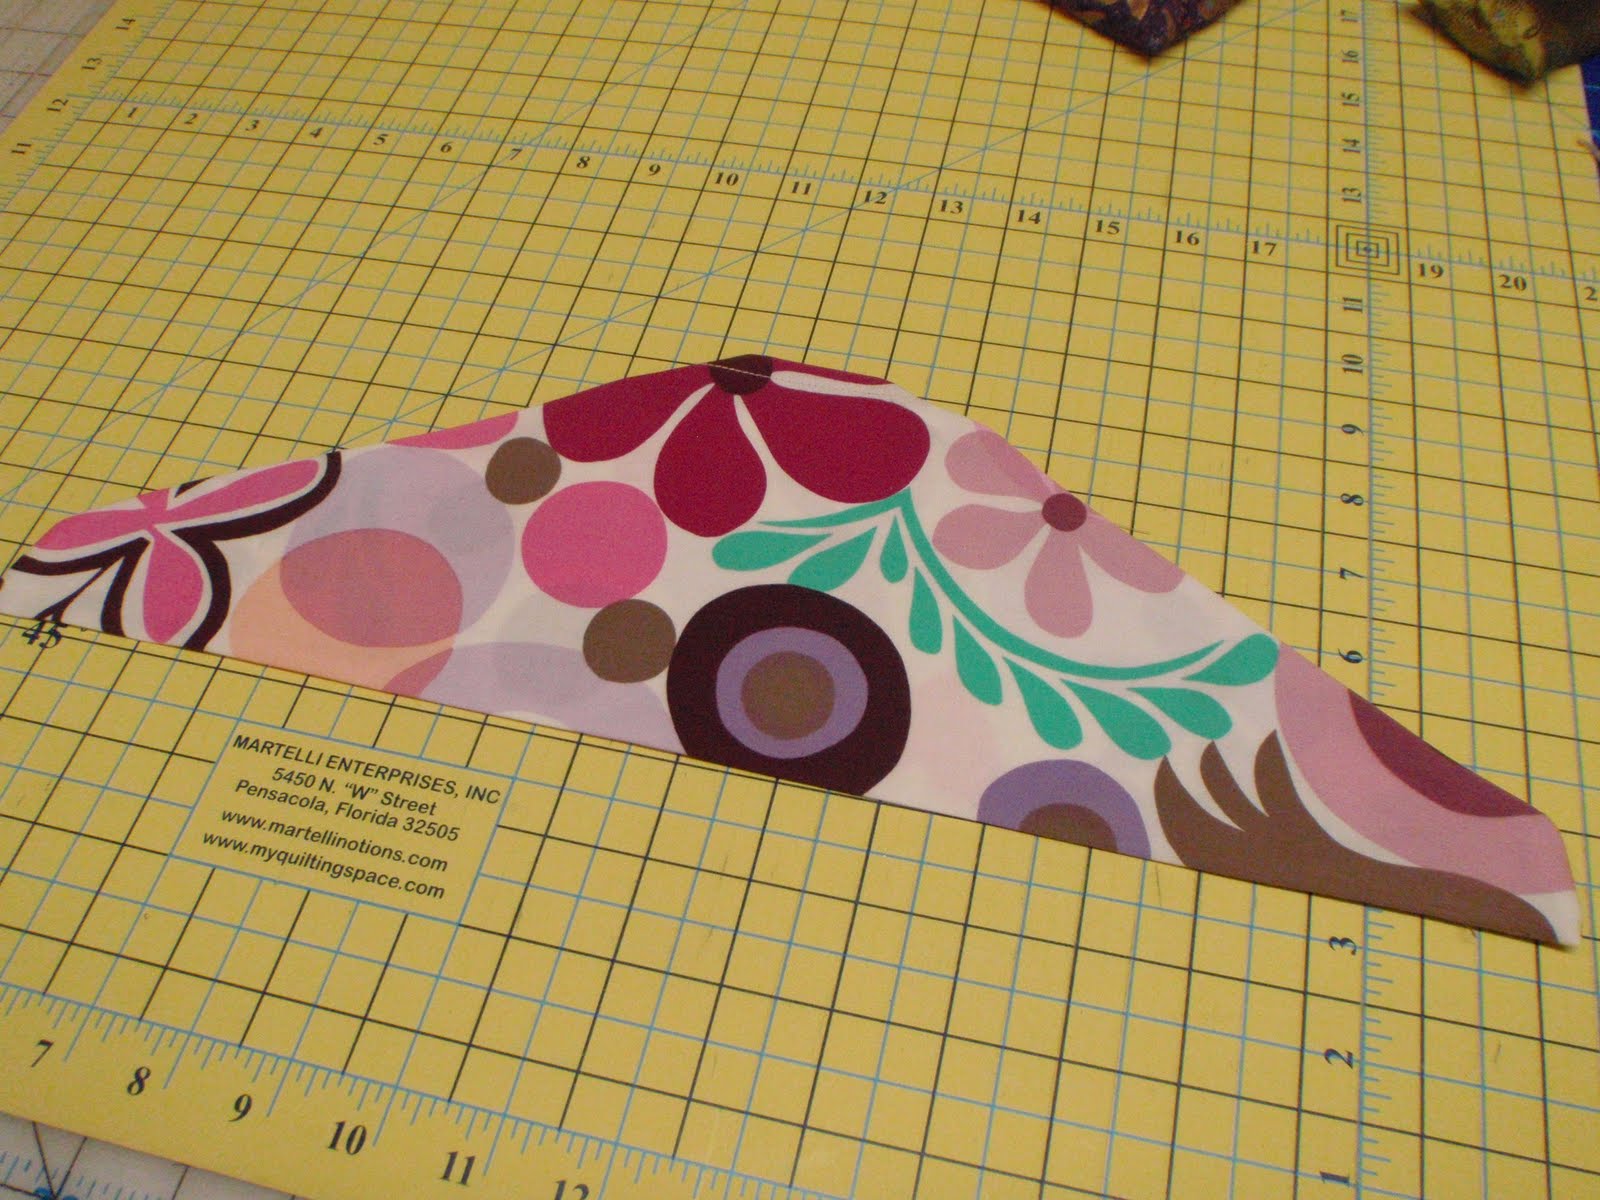
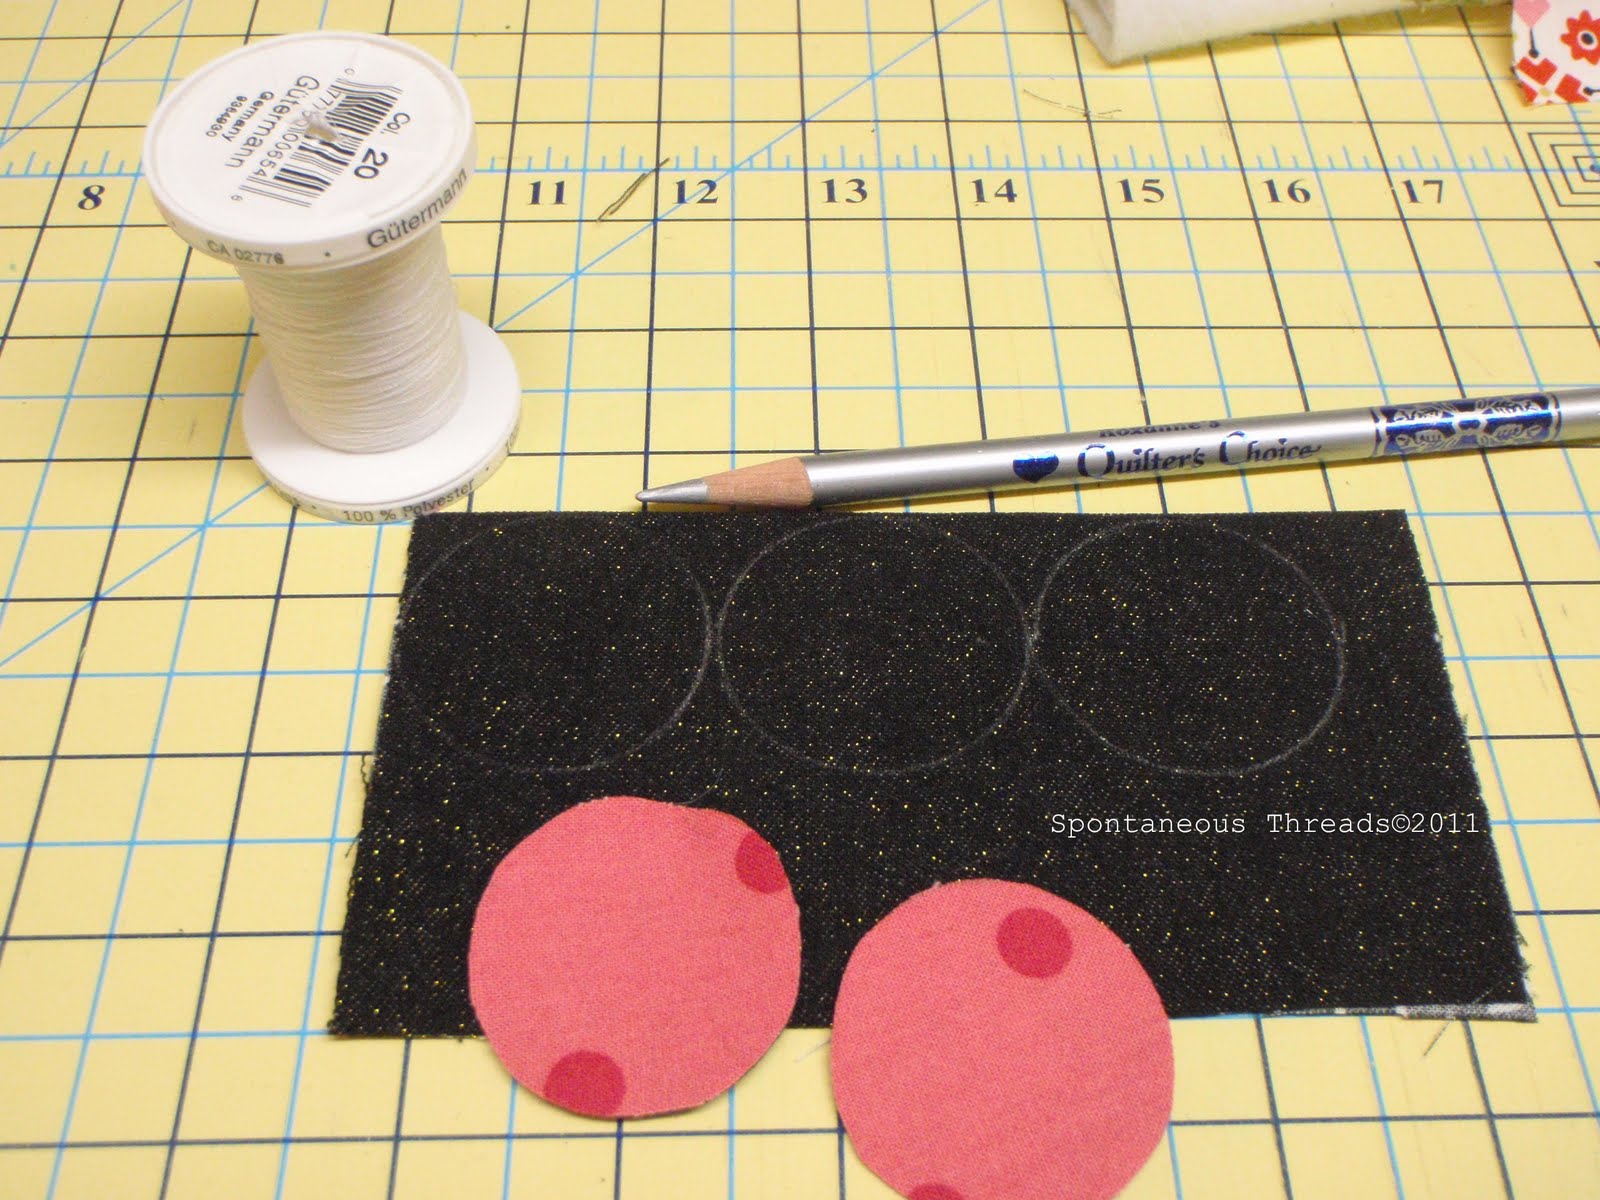
Trace your hanger (omitting tracing the hook) directly onto the fabric (folded in half so you are cutting both pieces at the same time) you selected giving yourself a 1/4" seam allowance. Martha suggests 1/2" but you quilters out there might go for 1/4", it's up to you, but be consistent.

Cut out your fabric along the traced lines.
*** Now here is where one can exercise some creative license. Say you have loads of strips of fabric scraps, you may sew your strips together to make your fabric, or patchwork them together, or even applique or embroider a monogram, be creative……. (now back to the scheduled program).

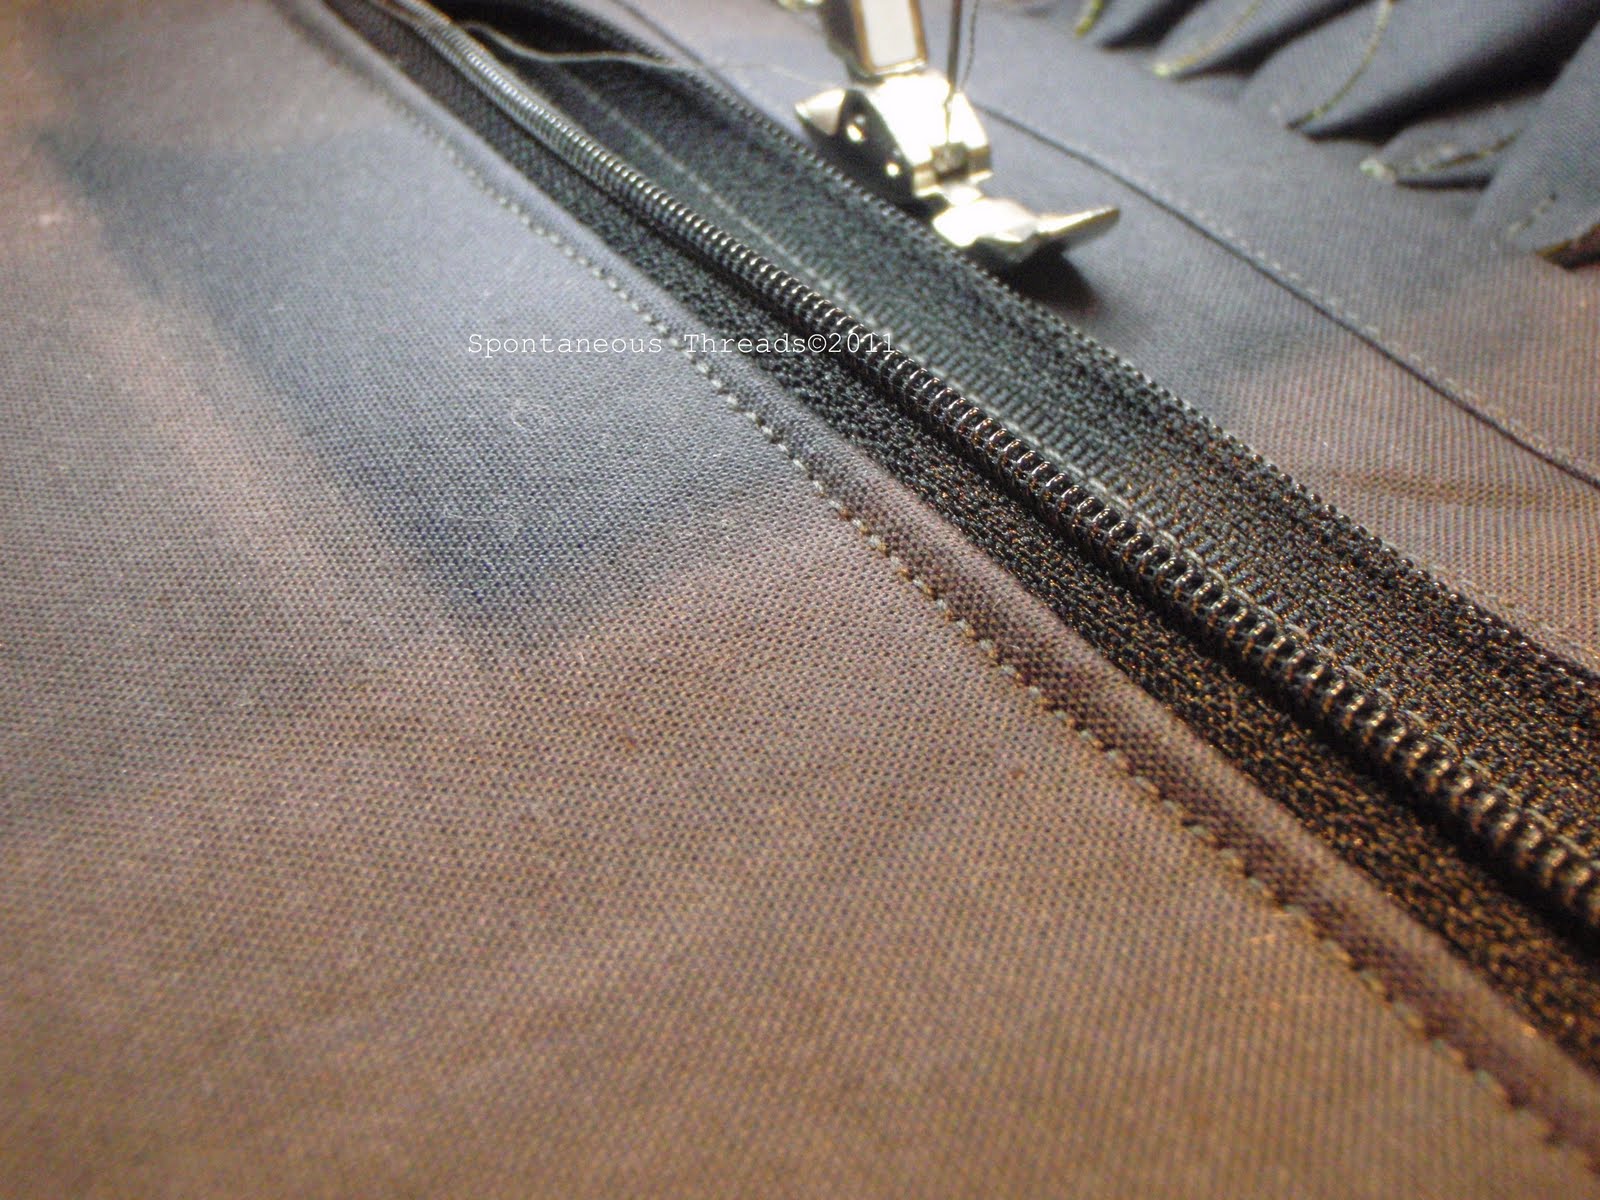
At the top opening where the hook of the hanger will be, press to the wrong sides 1/4 inch.

Stitch in place. Repeat both sides.

With rights sides facing, and beginning at where the hook of the hanger will eventually be, sew around your fabric keeping with your chosen seam allowance.
Stop about 6" from the where you started, leaving the top opening open.
Clip your curves, without clipping through your stitching.

Turn right sides out and press.

Slide chosen hanger into opening and folding seam allowances under.

Hand stitch opening closed.


If you have yucky hangers from the dry-cleaners you might want to upgrade to some nicer ones, and these covers could even be made to cover the colorful plastic hangers that many people use these days. Regardless of your hanger choice, they look MUCH better covered. You can dress up the hook with some ribbon and glue, it's up to you.

Now, making one hanger is not in itself a stash busting tutorial, however, make a set for your closet and you will soon see a reduction in you fabric scraps and stash.

May I also suggest that you wash all the fabrics that you might use for this project in advance. You wouldn't want any color transfer onto your clothes. This is especially important if you are using batiks and colored linens or flannel.

Other laundry room accessories you might want to try:
Ironing board covers: Marmadaisy and Jonag
Laundry bags: Amy Butler's In Stitches

Hope all these yummy projects make your laundry room Fancytastic.

Up on Friday - inspirational photos over at Blue Bird Sews and right here. Friday is also the last day to post your scraps to either the US or Internation Swap collectors (otherwise known as Jenna- International swappers and Kelly- USA/Canadian swappers). And if that is not enough excitement for you, Saturday will be my very first Stashtacular giveaway.  Announced right here.


Wednesday, July 27, 2011

Clothes pin keeper redux, week 3 Stashtacular


Stashtacular


I cleared it with the boss, since it's OK to use your fabric stash, it's also OK to use a previously posted tutorial (also know as a "tutorial stash", although my cup doth not runneth over in this category). So, if you have seen and perchance made my clothes pin keeper tutorial, I hope you are using it and it is serving you well. You even have a bit of a leg up so go post a picture over on the STASHTACULAR Flickr page.  If not,  then hopefully you will be in for another way to use up some fabric from your stash. Click here for the fancytastic tutorial.


Don't forget to check in with Jenna and Kelly and see what Stashtacular things they've got going on. And come back and see me tomorrow for some other cool things you can make for your laundry room. You will be the envy of all your friends.

Tuesday, July 26, 2011

Tuesday is Jenna's day, hello can you hear me??


Stashtacular


Today Jenna is hosting a tutorial over at Sew Happy Geek for a iphone/ipod case. I don't have an iphone but plenty of my friends do. Thanks Jenna. OK, the rest of you, go forth and make!!!!!!!

Monday, July 25, 2011

STASHTACULAR week 3, MY week


Stashtacular

Week 3! Give yourselves a big old high-five!! I still can't believe all the great ideas flying around out there. It's really going to be hard picking a project from all the "mades" from all the tutorials and featuring that one lucky person on our blogs at the conclusion of this month long event. You guys are awesome. I'm inspired by all of you.

This week I get to host the give-away, on this Saturday,  I will giveaway a $25.00 gift certificate from 1choice4quilting , to one lucky winner. I have been waiting to give anything something away since the STASHTACULAR began. I guess there will be more stuff to give away at the conclusion of STASHTACULAR, it's the waiting that gets to me- but I have been patient and so now it's my time. (yay).

Week in brief (just since I can't wait)…….

Today: another great tutorial over at Blue Bird Sews. A re-usable shopping bag!
Tuesday: Jenna at Sew Happy Geek follows up with more awesome things to sew while busting your stash and she will treat us to some additional stash busting tutorials.
Wednesday: I will re-visit a much loved (by me that is) tutorial on a fun clothes pin keeper
Thursday: I get to further inspire you (I hope) into sewing a few more things for the laundry room with a mini tutorial and links to additional projects.
Friday: photo inspiration at Blue Bird Sews and Spontaneous Threads (that's me). Friday is also the very LAST day (USA) to mail in your scraps if you are participating in the scrap swap. (Details can be found over at the STASHTACULAR Flickr page, but you really must hurry).
Saturday: the give-away will be back here.

So, in order to be eligible for the giveaway in this, my week, you must leave me a comment on my blog on any day this week (Monday through Friday). You may let me know that you made Kelly's reusable shopping bag, or Jenna's tutorial but you must comment here. (It's the only way I can keep track). You may comment each day, but only once a day. You can comment on the STASHTACULAR, on the weather or tell me something about yourself so I can get to know you better. I'm thinking I might throw an additional something in to sweeten the pot for a comment that really makes me smile. At the end of the week (Saturday) I will pick a winner from all the comments and post that winner's name here on my blog on Saturday during the day. You will have to check back and see if it's you,( if you are a no-reply blogger), otherwise I will email you directly for your info. So, leave a comment and keep your fingers crossed!!!

Sunday, July 24, 2011

Challenges and Swaps and challenging swaps!

My Sunday installment of Stashtacular round ups, swaps and although not a swap, our next guild challenge. "Sew" I mentioned last Sunday my Sewn Spaces Swap, needle book cover, Mr. Mouse. Well, this week, I received (and scored the jackpot!) my needle book cover- from Suzettra.

My chosen color was turquoise and I actually commented that I loved this one, but thought it couldn't possibly be for me because it said "Pinks" on the front. Sneaky, sneaky. Suzettra did some awesome stalking because, although she used some pink fabric, the "Pinks" refers to flowers not the color and one of my other favorite things to do is garden. The center of my needle book holder has a wee hedgehog and a squirrel and beautiful hand stitching. Lots of fun, fun fabrics are pieced on the outside and my package also contained a wee pincushion and some turquoise and red floral fabric and "thread". I loved everything about it and will use it.

Which brings me to some of my thoughts about the Needle book swap and my guild challenge. Initially I toyed with a sewing case and not a needle book, but it seems that the overwhelming majority of folks were doing the needle book and what had in my mind (for a sewing case) I just didn't have the time to execute properly. (There were a few design details I had to ponder and work out). So, using my quilt guilds' Jay McCaroll Habitat Fabric Challenge (Habitat for your Habitat) as an opportunity- free fabric, 1/4yd by 1/2 the width of the fabric (fat eight's) chosen from what was so generously donated by Freespirit Fabrics- my guild sorted and cut and gave everyone 6 random pieces…….
The quilt guild fabrics, I used the three on the right. 

 …..and send us off to make what ever we wanted. The only "rules"were that the Habitat fabric be showcased in the project we chose. Have you seen this fabric? It's pretty edgy- I'm still trying to figure out how some of it goes together- Here is what Generation Q Magazine had to say:


Habitat by Jay McCarroll (FreeSpirit/Westminster Fibers)
Jay McCarroll of Project Runway fame is getting tons of attention these days with his new line from FreeSpirit, Habitat. These edgy, bold prints are definitely not fussy and matchy-matchy, as you’d find in many collections with lesser punch. Instead, each print is unique and stands strongly on its own, yet plays nicely with its sister cuts. There are three colorways in Habitat, and we picked the boldest teals and plums to share with you here. Plus, there’s a very soft pink and beige combo that feels much more girlie and a dark pink and olive collection that will give us something crisp to cling to, after weathering the summer’s heat. We can  envision some incredible, creative bedding from these highly energetic prints, but there’s also a life beyond patchwork here. Can’t you just see these stretched over canvas and hung on the wall as art? Move over, Marimekko!


So, you see, it's not just me- anyway, I chose 3 of the 6 that I though looked best together (there was no requirement that we use some of every fabric this time), added one additional Habitat fabric
my fabric addition, also habitat
 ( a safe polka dot) and a Kona coal (med-dark gray) and decided I would make my sewing kit. My "design" (still in my head and still in my head)
one side, with the Kona coal

the other side

 featured a zip around zipper that when unzipped would lay the sewing case flat, for easy access to its contents. Small enough to travel with, yet big enough to hold sewing supplies.
interior without supplies, yet
My finished piece is around 8.5" x 4.5"x 2.5". And the BEST thing is that it easily fits my Oh So Lovely Needle Case and pin cushion (from Suzettra) as well as a few other vital sewing supplies.
Interior with scissors, measuring tape, threads and needles

interior with my lovely needle case and pincushion
I still have fabric left over from the 3 Habitat fabrics that I didn't use. I still could make something from these. I'll let you know if I do.
Finished sewing kit with habitat fabrics pieced on the sides and pieced around the zipper.

Lessons learned:
1. I need to plan ahead slightly better. I get on a roll and the next thing I know I wish I had done something that I did not.  Now that I have made one, I can make my life a whole lot easier making the next one with what I learned.
2. I used some of my stash to finish this case (Kona coal and a zipper)
3. I'd need to make hundreds of these to make a serious dent in my stash. (so, what's new).
4. With minor modifications to the size and zipper placement this would be a great bag for make-up and a great size for travel.
5. The zipper was much easier to put in than I thought it might be.

Additional thoughts: I still have Habitat fabric left over- I should participate by making some of the tutorials in the STASHTACULAR. So, more Habitat for my habitat that's STASHTACULAR and Fancytastic too boot!- to go with my sewing case-
Habitat fabrics pin cushion, STASHTACULAR tutorial by Kelly. Don't know about you (and I did do this on purpose) but the fabrics and the color contrast remind me of those "radiation" symbols they put up in hazardous places…… Photographed on a piece of Habitat fabric I had yet figured out how to use.
And then, my Habitat apron with a STASHTACULAR tutorial by Jenna. Hope Jenna doesn't mind, but I made the border smaller (working with the Habitat fabric I had) and added a double welted pocket. (I need a pocket in my apron).

Lessons learned:
1. make the double welted pocket BEFORE you sew the pleats and put the waist band on the apron.
2. always practice this pocket finish before you dive into your project (I don't usually do this, but did this time and was very happy I did), My first attempt wasn't as precise.
3. I like the topstitched pleats- makes it a bit more "industrial".
4. Always try and photograph your finished projects in good natural light (not late at night when you finish them in a dimly lit basement).
Used the orange Habitat fabric (yay- thought I might actually have to wait till Halloween). Pieced the waist and the bottom border/hem. The pocket is made "double-welted" from a tutorial HERE. Apron background fabric, Kona coal from my stash.

Pocket close up, just big enough for my phone. 

 Hope your weekend is what you had hoped it would be!!!


Saturday, July 23, 2011

Stashtacular winner at Sew Happy Geek!


Stashtacular
Go here and find out if you won! (It's a jelly roll from Fat Quarter Shop). Get your tutorials going and sort through your scraps, there is only 1 week left to get those goodies in the mail. Details can be found at the STASHTACULAR Flickr page.

Friday, July 22, 2011

Friday, Friday, week 2 coming to a close.


Stashtacular


STASHTACULAR Friday, week 2. Wow! Some seriously great tutorials and inspiration out there. Thanks to all our great participants- we are almost half way through the STASHTACULAR event. Kelly at Blue Bird Sews is hosting today and I'm heading over to her blog to learn how to improve my embroidery skills. I can manage a basic running stitch-sometimes, add a curve and I'm in for a crash! I can't wait to post some of my news skills over at the STASHTACULAR Flickr page.
Tomorrow will be having giveaway #2, a $25.00 gift certificate from 1choice4quilting. Jenna will be giving it away to one very lucky person over at Sew Happy Geek. Go over there tomorrow and see if you are the lucky winner.

Thursday, July 21, 2011

STASHTACULAR Thursday


Stashtacular


It's Thursday, so today it must be…… Kelly at Blue Bird Sews. She has some tips, techniques and inspirational links for stash busting.  Kelly will be the star again on Friday with some great embroidery hoop information and inspiration. I definitely need to check that out, my embroidery skills need some personal help. Speaking of Flickr I seriously hope you all are getting your pictures posted over at the STASHTACULAR Flickr group page.

Wednesday, July 20, 2011

Take me out, PLEASE! (A tutorial- not a plea for help).


Stashtacular

My turn again for a Wednesday tutorial, but first, if you are sewing and quilting along don't forget to post those photo's over on the STASHTACULAR Flickr page.

Today, I give you the option to:
Take me out, please!!! 
A tutorial, in several styles, of a hip, swingy wristlet that is begging for a night on the town.


in a metallic denim


Materials:
 (I love this part)
fabric from your stash! (2 or 3 fat quarters plus little scraps about 1.5" square)
a 14 inch zipper, color to contrast or coordinate
fusible fleece, 12" x 12" square
heat and bond light (or fusible web)
sewing machine and thread

{you will be viewing photos from the 2 wristlets that will be the "variations" I mentioned. I realized once I had finished one and started writing the tutorial, that I needed WAY more photos. So, you are not seeing camera color funkyness, that's just 2 wristlets being constructed.}


Materials for metallic denim wristlet


Select the fabric that you will use for the main body and lining of your wristlet and cut a 12" x 12" square from each piece. Keep remaining pieces from your fat quarter- you'll need them.

design choice: from either your main fabric, or another of your choosing, cut a 10" x 10" square
cut a 10" x 10" square of heat and bond lite (or similar fusible web)
fuse heat and bond to fabric


design choice: from another complimentary fabric, or fabrics, cover the other side of the heat and bond

from this fabric-heat and bond-fabric sandwich, cut out 20, 1.5" circles (I used a spool of thread to trace circles)- set aside


make a sandwich from your main fabric, fusible fleece, lining fabric 12" x 12" pieces. Fuse main (outside) fabric to fleece. If your sandwich is correct, the right sides of the main and lining fabrics will be showing with the fusible fleece in the middle.


Lay this sandwich on your ruled cutting mat and mark a line (with a light chalk pencil) 2" from the top of your square. This will be the line that you will sew the circles too.


Take you circles and fabric sandwich over to your sewing machine 


 Using the marked line as your guide and starting 1" from either side, you will be attaching your circles (now folded) to the wristlet front.


Folding the circles. Take a circle, main fabric away from you and fold an edge from each side to the middle at the top only (see photo). It will form a cone. 


Place cone, pointed end at line (the one you drew on your fabric earlier) and using a straight stitch, stitch into cone about 1/2" and back out right over stitch line.


repeat for 9 additional cones (10 total).


Then using the remaining circles, making additional cones, place these between the cones already in place (see picture) and stitch in the same manner.


it's 3-D


There is a finishing detail that can be added here IF leaving the tips of the cones "raw" bothers you. I have made 2 wristlets one with and one without this technique- you may decide. Both will be photographed at the very end of this tutorial so that you can make that decision for yourself. I like both!!
The following instructions are for covering the tips:


 Using a scrap piece of binding (or cutting something from your stash, you will need fabric 13" x 2.5". Iron wrong sides together along the length of the fabric. (I used binding cut straight of grain from my Robert Kaufman Solids Challenge Quilt, so I'm stash busting). This binding was pieced for the quilt, but you may leave yours plain, or use a contrasting fabric for a design statement.
Keeping the raw edges to the top (away from the circle/cones) place the raw edge along the line you previously drew for your cone placement guideline). Using a 1/4" foot (or just stitching 1/4" from the raw edge), stitch binding in place.
 I had extra binding so I kept going, but you could easily stop after your first binding application. Iron binding away from your 3-D cones covering the raw pointed cone tips. Top stitch in place.
 I used a double layer because I am stash busting, but one layer is sufficient to cover the raw tips of the cones. This is purely a design finishing detail. Please see the pictures at the end of this tutorial for the look of covered or uncovered tips.


Back to the tutorial in session-
Prepare your zipper. With the zipper mostly closed, snip off the metal end stop opposite the zipper pull, set zipper aside.


Cut a 2.5"x 4 inch strip of fabric (these will be your zipper stops, so plan your fabric according to whether you would like to be the same as the main wristlet fabric or to contrast with it). Using  hot iron, iron fabric strip in half long ways. Open and iron each edge to the center. Then fold in half again (encasing raw edges) and iron. 

Using this prepared strip, place the cut end of your zipper into the open side (long) end of the just ironed fabric, butting the cut ends of the zipper against the fold. Stitch at edge opposite the fold essentially covering the raw edge of the zipper and making a fabric zipper stop. Trim.


Using your wristlet as a gauge for length, place zipper with cloth stop about 1/2" from one edge across the top, parallel to the circle/cone adornments and using the opposite edge, mark on the zipper just a smidge past 1/2" from the edge of the wristlet. Cut the zipper here (making sure the zipper pull is NOT on the end you are planning to cut off. Move the zipper stop to the middle of the length of the zipper you will be using before you cut. Keep the zipper stop here for awhile and prepare cut end of zipper in a manner similar to the other end.


Now you have a lovely zipper with cloth zipper stops.

Now here we go,
Taking your main body of the wristlet, cut 2 rectangles (by making one cut) parallel to the cone/circles, 6" from edge so that you will now have 2 rectangles 12" x 6". One side will have ruffles, the other not.
Cutting the piece at this point will make inserting the zipper easier for novice zipper people. (I have also made this bag without cutting it into 2 pieces, that is your choice. 

Lay your prepared zipper, face down, right at the edge of the circle/cone piece, parallel to  edge closest to the circle/cones, and 1/2" in from the edge of your wristlet.  Stitch in place using your zipper foot. The zipper should also end about 1/2" from the opposite end of you main body piece if you have done things correctly.


Place the other 12" x 6" wristlet piece, right sides facing (outside of wristlet against the right (out) side of zipper. Stitch in place with your zipper foot.


Now, these next few steps are finishing technique: I think it adds more to the wristlet as a whole. I've seen small bags and pouches make without these, so it doesn't effect the usability of the final product. Personally, however I do think it finishes the wristlet in a more professional manner. Plus it will keep little threads from becoming stuck in your zipper- such a drag. It only adds a few additional steps to the whole tutorial.

With your zipper in place, and stitching through all layers, zig-zag the raw edges along both sides of the zipper. (DON'T do this step with your zipper foot in place- remember to change out your feet!!!!!).


Then flip the wristlet over so that the outside is facing up. Folding the zipper back upon itself, to the underside or interior of the wristlet topstitch in place using your zipper foot and keeping close to the folded edge so that you are catching the folded under zipper foot and stitching it out of the way of the zipper. Repeat both sides.


Cut fabric for the wrist strap. Take a scrap piece of fabric, the same as or complimentary to your wristlet main fabric and cut a piece 14" by 2.5 inches. Prepare in a manner similar to preparing the fabric zipper stops. After ironing, stitch the long open edge closed keeping close to the edge.


Fold wrist strap in 1/2, raw-end edges together and place the wrist band about 1" down from the top edge (zipper edge) of your wristlet and pin in place. The wrist band will be sewn into place when the side seams are sewn.


Fold  entire wristlet in half, right sides facing, zipper along one edge. The wrist strap is now enclosed by fabric. Line up side edges and using a 1/2" seam allowance, stitch from top to bottom along both sides. Back stitching at top edge of seam. Trim stitched edge to 1/4" and zig-zag raw edges.


Repeat for the other side.

NOW IS THE TIME TO OPEN THE ZIPPER IF PREVIOUSLY IT HAD BEEN ZIPPED CLOSED. THIS IS VERY IMPORTANT!!!!

Make sure bottom edge of wristlet is even (if not trim), and stitch a 1/2" seam, trim to 1/4" and zig-zag raw edges.

Now, time for another design decision. You could at this point call it done. Turn your wristlet right side out, push out your corners and go out an have a fine time, 
OR
you could make a small box pleat in each corner so that the bag would stand up on it's own.


 Pinch the wristlet at the bottom corners lining up the side and bottom seams pushing one finished seam to one side and one to the other to reduce bulk. Measure in about 1.25 " along the seam and stitch perpendicular to that point.
 Cut off excess fabric and zig-zag raw seam edge (not shown)


Turn your wristlet right side out and marvel at your handy work! 


close-up of covered tips

tips covered, box pleat bottom
Kona solid in charcoal grey left over from my "Out of the Blue" Robert Kaufman Solids Challenge Quilt.
Interior circle/cone from my stash, ditto for handle of wristlet.

tips uncovered
Metallic denim wristlet- fabric from my stash, (different black/white scraps and turquoise and coral Kona solid scraps, also from my stash)
Box pleated bottom


No matter which way you finish your wristlet, just remember- enjoy and Take her out, please!!!!!

Tomorrow Kelly will have some fun things to do over at her blog, like making some easy napkins and some links to go with that. Don't forget to stop on by. 

As you finish your tutorials post pictures of your finished work on the STASHTACULAR Flickr page.
Posting photos of "makes" and scraps-to-swap will make you automatically eligible for fabulous prizes!