
My turn again for a Wednesday tutorial, but first, if you are sewing and quilting along don't forget to post those photo's over on the STASHTACULAR Flickr page.
Today, I give you the option to:Take me out, please!!! A tutorial, in several styles, of a hip, swingy wristlet that is begging for a night on the town.
 |
| in a metallic denim |
Materials: (I love this part)fabric from your stash! (2 or 3 fat quarters plus little scraps about 1.5" square)a 14 inch zipper, color to contrast or coordinatefusible fleece, 12" x 12" squareheat and bond light (or fusible web)sewing machine and thread
{you will be viewing photos from the 2 wristlets that will be the "variations" I mentioned. I realized once I had finished one and started writing the tutorial, that I needed WAY more photos. So, you are not seeing camera color funkyness, that's just 2 wristlets being constructed.}
 |
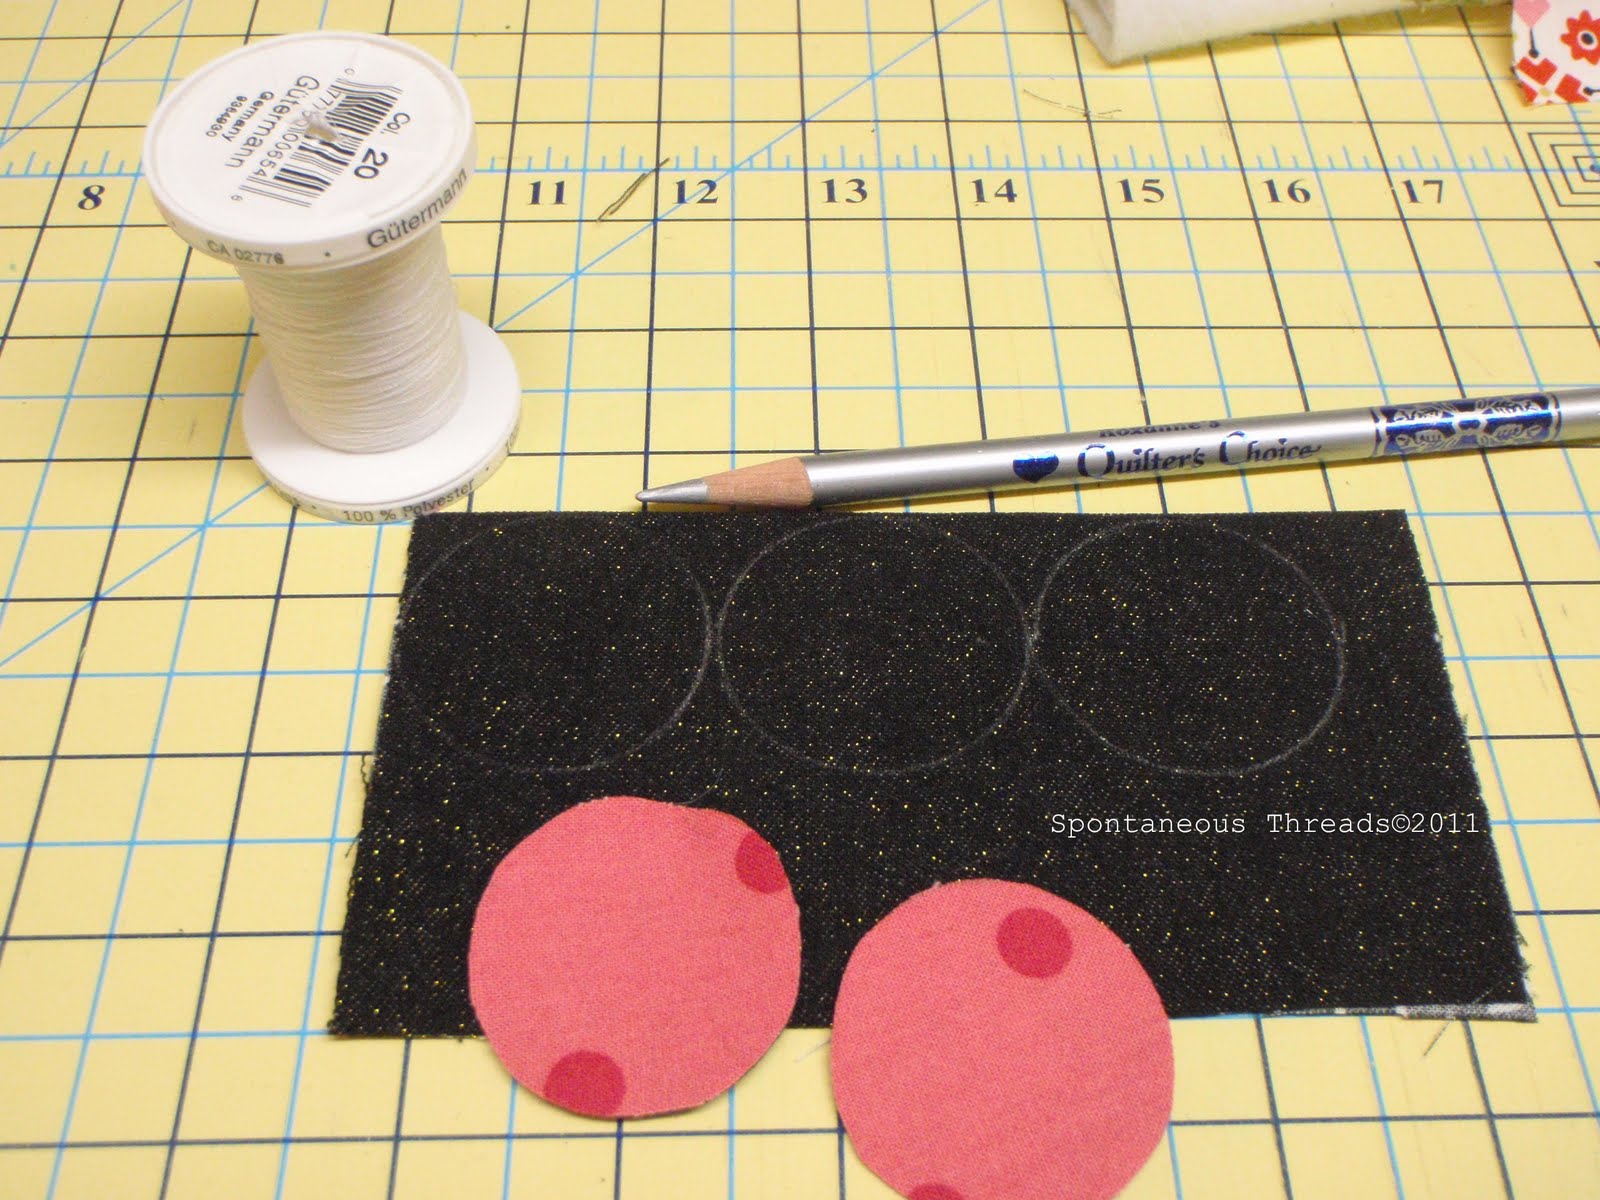
| Materials for metallic denim wristlet |
Select the fabric that you will use for the main body and lining of your wristlet and cut a 12" x 12" square from each piece. Keep remaining pieces from your fat quarter- you'll need them.
design choice: from either your main fabric, or another of your choosing, cut a 10" x 10" squarecut a 10" x 10" square of heat and bond lite (or similar fusible web)fuse heat and bond to fabric
design choice: from another complimentary fabric, or fabrics, cover the other side of the heat and bond
from this fabric-heat and bond-fabric sandwich, cut out 20, 1.5" circles (I used a spool of thread to trace circles)- set aside
make a sandwich from your main fabric, fusible fleece, lining fabric 12" x 12" pieces. Fuse main (outside) fabric to fleece. If your sandwich is correct, the right sides of the main and lining fabrics will be showing with the fusible fleece in the middle.
Lay this sandwich on your ruled cutting mat and mark a line (with a light chalk pencil) 2" from the top of your square. This will be the line that you will sew the circles too.
Take you circles and fabric sandwich over to your sewing machine
Using the marked line as your guide and starting 1" from either side, you will be attaching your circles (now folded) to the wristlet front.
Folding the circles. Take a circle, main fabric away from you and fold an edge from each side to the middle at the top only (see photo). It will form a cone.
Place cone, pointed end at line (the one you drew on your fabric earlier) and using a straight stitch, stitch into cone about 1/2" and back out right over stitch line.
repeat for 9 additional cones (10 total).
Then using the remaining circles, making additional cones, place these between the cones already in place (see picture) and stitch in the same manner.
 |
| it's 3-D |
There is a finishing detail that can be added here IF leaving the tips of the cones "raw" bothers you. I have made 2 wristlets one with and one without this technique- you may decide. Both will be photographed at the very end of this tutorial so that you can make that decision for yourself. I like both!!The following instructions are for covering the tips:
Using a scrap piece of binding (or cutting something from your stash, you will need fabric 13" x 2.5". Iron wrong sides together along the length of the fabric. (I used binding cut straight of grain from my Robert Kaufman Solids Challenge Quilt, so I'm stash busting). This binding was pieced for the quilt, but you may leave yours plain, or use a contrasting fabric for a design statement.
Keeping the raw edges to the top (away from the circle/cones) place the raw edge along the line you previously drew for your cone placement guideline). Using a 1/4" foot (or just stitching 1/4" from the raw edge), stitch binding in place.
I had extra binding so I kept going, but you could easily stop after your first binding application. Iron binding away from your 3-D cones covering the raw pointed cone tips. Top stitch in place.
I used a double layer because I am stash busting, but one layer is sufficient to cover the raw tips of the cones. This is purely a design finishing detail. Please see the pictures at the end of this tutorial for the look of covered or uncovered tips.
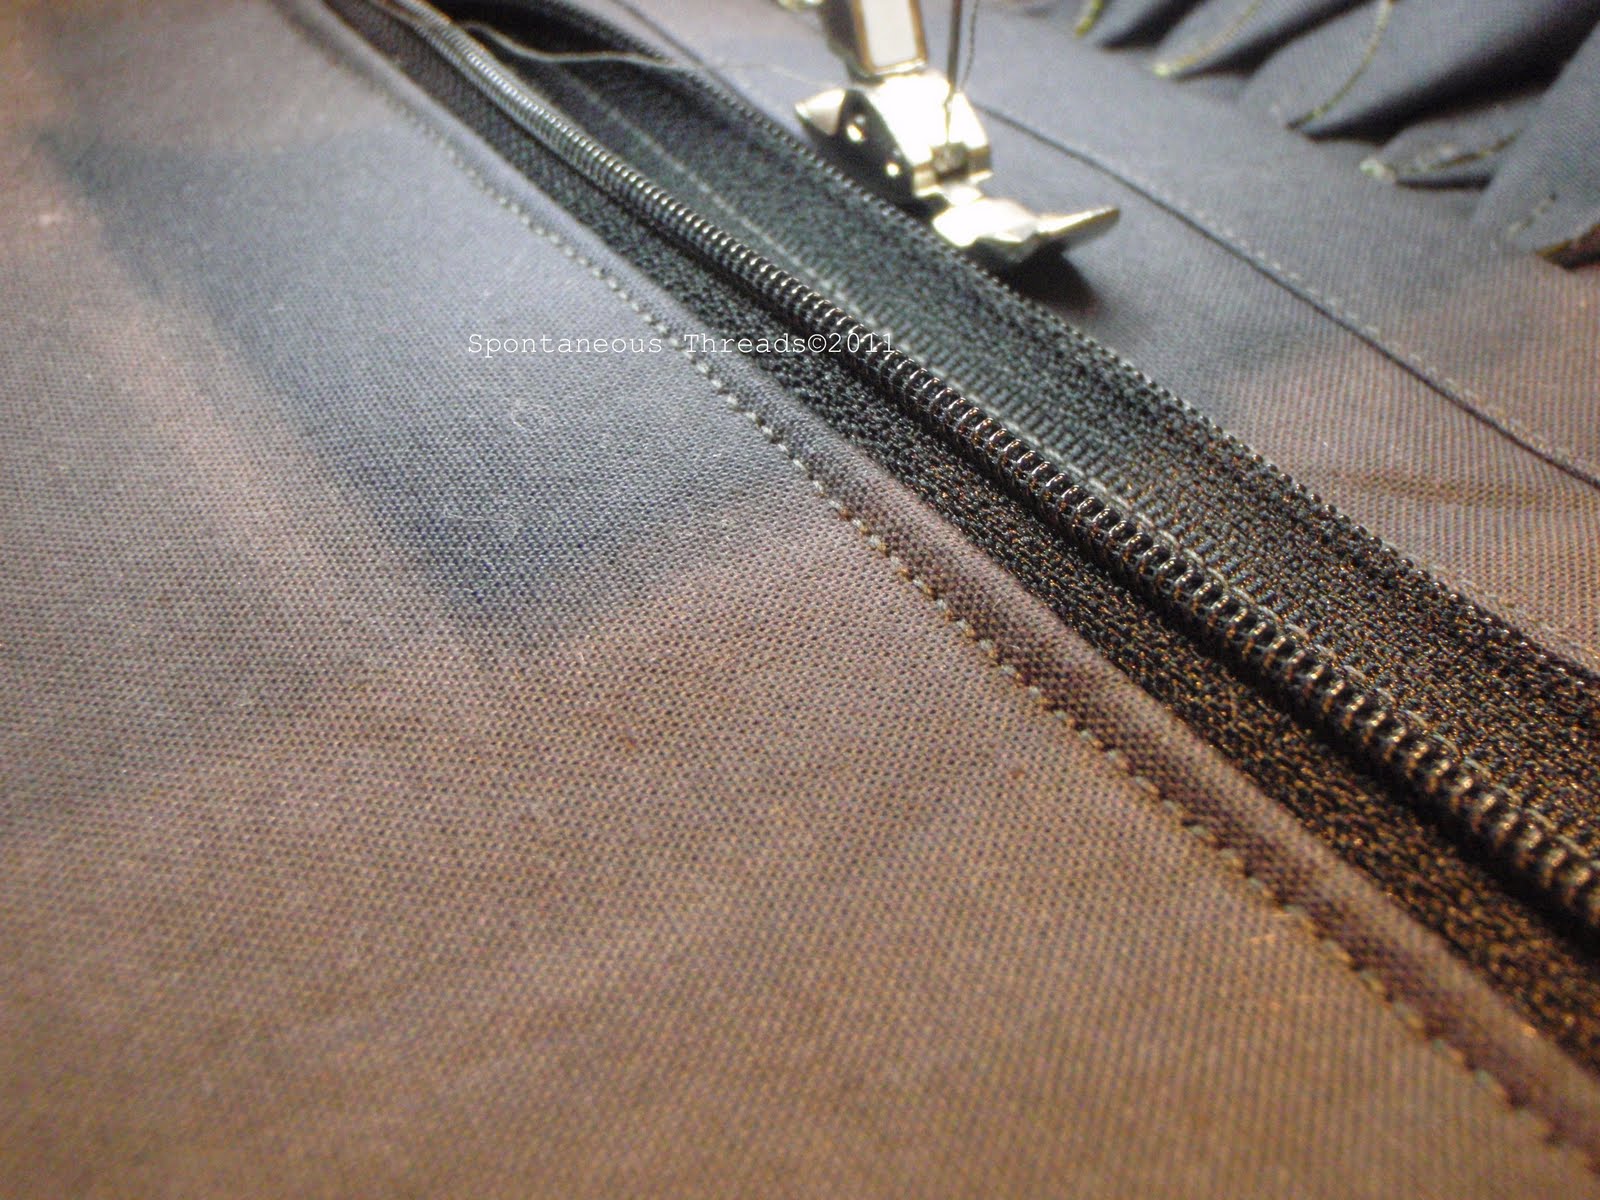
Back to the tutorial in session-Prepare your zipper. With the zipper mostly closed, snip off the metal end stop opposite the zipper pull, set zipper aside.
Cut a 2.5"x 4 inch strip of fabric (these will be your zipper stops, so plan your fabric according to whether you would like to be the same as the main wristlet fabric or to contrast with it). Using hot iron, iron fabric strip in half long ways. Open and iron each edge to the center. Then fold in half again (encasing raw edges) and iron.
Using this prepared strip, place the cut end of your zipper into the open side (long) end of the just ironed fabric, butting the cut ends of the zipper against the fold. Stitch at edge opposite the fold essentially covering the raw edge of the zipper and making a fabric zipper stop. Trim.
Using your wristlet as a gauge for length, place zipper with cloth stop about 1/2" from one edge across the top, parallel to the circle/cone adornments and using the opposite edge, mark on the zipper just a smidge past 1/2" from the edge of the wristlet. Cut the zipper here (making sure the zipper pull is NOT on the end you are planning to cut off. Move the zipper stop to the middle of the length of the zipper you will be using before you cut. Keep the zipper stop here for awhile and prepare cut end of zipper in a manner similar to the other end.
Now you have a lovely zipper with cloth zipper stops.
Now here we go,Taking your main body of the wristlet, cut 2 rectangles (by making one cut) parallel to the cone/circles, 6" from edge so that you will now have 2 rectangles 12" x 6". One side will have ruffles, the other not.Cutting the piece at this point will make inserting the zipper easier for novice zipper people. (I have also made this bag without cutting it into 2 pieces, that is your choice.
Lay your prepared zipper, face down, right at the edge of the circle/cone piece, parallel to edge closest to the circle/cones, and 1/2" in from the edge of your wristlet. Stitch in place using your zipper foot. The zipper should also end about 1/2" from the opposite end of you main body piece if you have done things correctly.
Place the other 12" x 6" wristlet piece, right sides facing (outside of wristlet against the right (out) side of zipper. Stitch in place with your zipper foot.
Now, these next few steps are finishing technique: I think it adds more to the wristlet as a whole. I've seen small bags and pouches make without these, so it doesn't effect the usability of the final product. Personally, however I do think it finishes the wristlet in a more professional manner. Plus it will keep little threads from becoming stuck in your zipper- such a drag. It only adds a few additional steps to the whole tutorial.
With your zipper in place, and stitching through all layers, zig-zag the raw edges along both sides of the zipper. (DON'T do this step with your zipper foot in place- remember to change out your feet!!!!!).
Then flip the wristlet over so that the outside is facing up. Folding the zipper back upon itself, to the underside or interior of the wristlet topstitch in place using your zipper foot and keeping close to the folded edge so that you are catching the folded under zipper foot and stitching it out of the way of the zipper. Repeat both sides.
Cut fabric for the wrist strap. Take a scrap piece of fabric, the same as or complimentary to your wristlet main fabric and cut a piece 14" by 2.5 inches. Prepare in a manner similar to preparing the fabric zipper stops. After ironing, stitch the long open edge closed keeping close to the edge.
Fold wrist strap in 1/2, raw-end edges together and place the wrist band about 1" down from the top edge (zipper edge) of your wristlet and pin in place. The wrist band will be sewn into place when the side seams are sewn.
Fold entire wristlet in half, right sides facing, zipper along one edge. The wrist strap is now enclosed by fabric. Line up side edges and using a 1/2" seam allowance, stitch from top to bottom along both sides. Back stitching at top edge of seam. Trim stitched edge to 1/4" and zig-zag raw edges.
Repeat for the other side.
NOW IS THE TIME TO OPEN THE ZIPPER IF PREVIOUSLY IT HAD BEEN ZIPPED CLOSED. THIS IS VERY IMPORTANT!!!!
Make sure bottom edge of wristlet is even (if not trim), and stitch a 1/2" seam, trim to 1/4" and zig-zag raw edges.
Now, time for another design decision. You could at this point call it done. Turn your wristlet right side out, push out your corners and go out an have a fine time, ORyou could make a small box pleat in each corner so that the bag would stand up on it's own.
Pinch the wristlet at the bottom corners lining up the side and bottom seams pushing one finished seam to one side and one to the other to reduce bulk. Measure in about 1.25 " along the seam and stitch perpendicular to that point.
Cut off excess fabric and zig-zag raw seam edge (not shown)
Turn your wristlet right side out and marvel at your handy work!
 |
| close-up of covered tips |
 |
tips covered, box pleat bottom
Kona solid in charcoal grey left over from my "Out of the Blue" Robert Kaufman Solids Challenge Quilt.
Interior circle/cone from my stash, ditto for handle of wristlet. |
 |
tips uncovered
Metallic denim wristlet- fabric from my stash, (different black/white scraps and turquoise and coral Kona solid scraps, also from my stash)
Box pleated bottom |
No matter which way you finish your wristlet, just remember- enjoy and Take her out, please!!!!!
Tomorrow Kelly will have some fun things to do over at her blog, like making some easy napkins and some links to go with that. Don't forget to stop on by.
As you finish your tutorials post pictures of your finished work on the STASHTACULAR Flickr page.Posting photos of "makes" and scraps-to-swap will make you automatically eligible for fabulous prizes!


REALLY fun! I am going to have to give this one a whirl.
ReplyDeleteThis is SO SO CUTE! I will be making one of these!
ReplyDeleteThis is a perfect excuse to use my Go cutter!
ReplyDeleteI love it. Itching to make one now.
ReplyDeleteThanks for the tute,posted mine to the group :)
ReplyDeletewhich heat and bond do you use? my machine doesn't like sewing through ultra - but I can't see lite staying together well..
ReplyDeleteThis is very cute! I think I'll make it this afternoon.
ReplyDeleteThese are so very cute! How do the circle ruffles hold up over time? Do they start to fray? Any other finishing advice you would do differently?
ReplyDeleteFirst time here, and this is one of my favorite pouch patterns!
ReplyDeleteThank you so much for sharing.