Tuesday, May 31, 2011
Protecting your blog and your photos
For all of you new to blogging (me included), PLEASE go check out Jenna's post at Sew Happy Geek. She is hosting a multi-part tutorial on protecting what is yours. Jenna recently had intellectual and creative property stolen from her blog and reposted on a blog that makes money when people visit that blog. There was no mention that the stolen tutorial and photos came from her. The other person just took them as their own. She has spent numerous hours trying to get "the powers that be" to shut down the other blog. You can chronicle her progress via her blog to see what happened and what's she has been able to do. The best thing we all can do now is spread the word. I you receive my blog feed, go check out Jenna's blog and then let people who follow your blog know what is going on out there. Link back to her tutorials and spread the word. Let's make it difficult for those stinkers people who are stealing photos and tutorials and claiming them for themselves. And let's all be good bloggers; if your using someones pattern (even if it's free) give them a shout out and some blog love. Yes, it takes a few extra minutes to link back to their blog, but it's so worth it. Yes, there are lots of ideas out there and, yes, they all can't be originals, but if you know you're borrowing- be nice and link back. And if you already do some of these blog- protective measures and have developed some must use tactics PLEASE share your info with Jenna or blog about them and post comments here and on Jenna's blog Sew Happy Geek, or pop us an email so that we can link back to you. She's trying to get the word out and it would be awesome if this could go "viral" (in a really good way). Have a great day and if you can, spread the word.
Sunday, May 29, 2011
Oh, Oh, Oh!!!!
Look! Click on this link- Fat Quarterly. My sewing machine cover that I made in the Sewn Spaces Swap on Flickr is on Fat Quarterly!!!! OMG. Wow, it's in great company. Go click on the pictures and see some lovely flowers!!!
EEEEK!

EEEEK!

Saturday, May 28, 2011
Robert Kaufman Solids Challenge Quilt- Completed!
It's finished! Thanks to all of you regarding thread suggestions. Stats on "Out of the Blue" below
(after a few photos…..)
(after a few photos…..)
 |
| Front, "Out of the Blue" . Wonky rainbow pinwheels- center; modified linear pinwheel - inner border. Pieced binding. |
 |
| Back, the center meandering quilting and the liner border quilting really stands out on the back as does the variegated thread. Pieced binding tot he right in the picture. |
 |
| Close up of the title pinwheel and the rainbow border frame. You can also see the pieced binding. |
 |
| Pinwheel and frame, back |
Size: 56 X 62 inches
Materials: Challenge materials- two Kona charm packs in brights. (One provided by Robert Kaufman via my local Quilt Guild ), the additional charm pack I purchased for the binding and the 1" squares on the front and rainbow border on the back. Rules- I had to use at lease one piece from each charm, 43 different colors in the pack, 44 colors in the quilt. I was allowed one additional material and I chose a solid, Kona Charcoal.
Threads: Aurifil, Ebony Acauarelli 100% cotton, ( #4665) in 50 wt.
Design: original, 43 pinwheels from charm park, fashioned traditionally then made wonky. Each pinwheel is unique, made from the charm pack in order of the colors, using 3 of the pinwheel blades from one color and one blade from the next color in the charm pack. Some of these are difficult to see in photographs, except at the change of colors (from purple to blue, red to pink, orange to yellow) where it is most striking. In addition, the quilt had to be greater than 40 inches on a side and so, I added, 1" squares in a modified interpretation of a linear pinwheel into the inner border, taking the dominant color of that corner of the quilt and then adding a color opposite that on the color wheel. The binding is straight cut with pieced 1" rainbow solid pieces added randomly.
Challenge: I had never made a quilt entirely from solids- ever.
Quilting: meandering, center pinwheels, spaced 1" linear quilting at inner and outer borders.
Title: Out of the Blue- I had one pinwheel remaining after I designed the front, and fittingly, I placed it on the back surrounding it with a rainbow frame. The pinwheel was blue, hence the title of the quilt. In addition, while I was designing and quilting there were terrible natural disasters occurring all over the world, (Japan, Alabama, Mississippi) and they all occurred, out of the blue, as well. Just something for me to think about……..
Friday, May 20, 2011
Do I really want to be invisible????
I need your help (I know I've been asking for much help lately). I am participating in the Robert Kaufman Solids Quilt challenge 2011 through my local quilt guild (Front Range Modern Quilt Guild). This started as a HUGE stretch for me:
1. take one charm pack (Kona Brights donated by Robert Kaufman)
2. add one additional fabric of the quilters choice (Kona charcoal)
3. mix into an original quilt design using at least one piece (size of said piece to be determined by the quilter) from each charm square (that would be 43 different colors).
4. make into a finished quilt greater than 50 inches in it's smallest dimension by the Guilds' deadline (ours is July, 2011).
So, letting the pictures and captions speak for themselves, I am at the pin basted stage (sounds like I'm cooking a turkey)- Because there are SO many colors in this quilt I contemplated using a thread similar to the solid I chose, the Kona charcoal. BUT, if I quilted over any of the wonky pinwheels, you would see the thread, I could change the thread (top only) for each pinwheel, but I'm not liking that so much, plus I don't think my budget can accommodate that grand idea. And, I pieced the back as well (I really thought it was a good idea at the time), and don't really want to oversew that little detail with a dark charcoal thread either. The $1,000,000 dollar question, have any of you ever used "invisible" thread? Do you have some words ofcaution wisdom you could share. I like the idea of not seeing the thread and just wallowing rejoicing in the quilted texture, but I really don't want to break down in tears if the thread is hard to work with, or takes bucket loads of TLC to pull it off. PLEASE tell me what you think. Bestow your wisdom upon me. In other words…… HELP!!!
I'm linking up at Whoop Whoop Friday at Confessions of a Fabric Addict. The button is on my side bar- go click on it. (Especially if you have gotten to this point and are shaking your head wishing you were elsewhere). Beautiful sewn items and quilts, and I don't think anyone is asking for your help!
1. take one charm pack (Kona Brights donated by Robert Kaufman)
2. add one additional fabric of the quilters choice (Kona charcoal)
3. mix into an original quilt design using at least one piece (size of said piece to be determined by the quilter) from each charm square (that would be 43 different colors).
4. make into a finished quilt greater than 50 inches in it's smallest dimension by the Guilds' deadline (ours is July, 2011).
 |
| charm square meets kona charcoal |
 |
| half square triangles, lots of half square triangles |
 |
| a purple pinwheel (say that 3-times fast) |
 |
| I'd say in alphabetical order, more like in rainbow-etical order |
 |
| pressed open, waiting "placement" |
 |
| traditional pinwheels |
 |
| wonky pinwheel |
 |
| wonky pinwheels, center of quilt top |
 |
| the center and the border, the tiny rainbow squares where added for interest to the border and laid out to mimic a pinwheel |
 |
| pin basted front |
 |
| and the back- the title of the quilt is "Out of the Blue"- I had a single pinwheel left after piecing the top. It's on the back along with a rainbow border and a small accent of rainbow squares at the bottom |
So, letting the pictures and captions speak for themselves, I am at the pin basted stage (sounds like I'm cooking a turkey)- Because there are SO many colors in this quilt I contemplated using a thread similar to the solid I chose, the Kona charcoal. BUT, if I quilted over any of the wonky pinwheels, you would see the thread, I could change the thread (top only) for each pinwheel, but I'm not liking that so much, plus I don't think my budget can accommodate that grand idea. And, I pieced the back as well (I really thought it was a good idea at the time), and don't really want to oversew that little detail with a dark charcoal thread either. The $1,000,000 dollar question, have any of you ever used "invisible" thread? Do you have some words of
I'm linking up at Whoop Whoop Friday at Confessions of a Fabric Addict. The button is on my side bar- go click on it. (Especially if you have gotten to this point and are shaking your head wishing you were elsewhere). Beautiful sewn items and quilts, and I don't think anyone is asking for your help!
Thursday, May 19, 2011
A good comment is sometimes hard to find
Well, I did draw a winner in the box-bag give away and boy, Karen Linton is a no-reply blogger and I haven't heard from her, so I had my daughter (the young lady who I started this whole scraps adventure for) draw another "winner" and so, Carrie McElfresh- Breath and Sew, it's you!! Thanks for commenting through Flickr! Since we are in a Bee together I have your address and will be mailing out your box bag Monday along with some other mail. Please let me know when it arrives! Hope you like it. Thanks everyone for all your delightful and very helpful comments!
Tuesday, May 17, 2011
A winner and a Quilt
OK first, the winner of the box bag, selected at random from all the lovely suggestions, both on my blog as well as via email goes to…….. Karen Linton! Congratulations Karen. Please send your address to me at spontaneousthreads@gmail.com and I will mail out your box bag to you. I must say that everyone's suggestions were wonderful and I have used several in filling the bag. The first gift goes this Friday and hopefully it will be a big hit! I would like to extend a particular thank you to Melissa for all the wonderful links to additional items that I could make using the scraps I have. I am including them here because they are worth looking at. I will be making one of the headbands and I will post photos when complete. Here they are:
headband
simple but sweet headband
ruffle headband
Ok- the Quilt. Done, finally- I participated in the Quilter's Block-a-Palooza this past spring. A novelty for me in MANY ways. One, committing to make a quilt, not knowing what the final quilt would look like. Two, keeping with the fast paced 2 block a week schedule. Three, trying to follow directions- I did the first 2 really well. The last, not so much, but, I did have great fun. I made several extra blocks working off the original patterns with minor modifications. Luckily, finishing options were given, (I like options), and keeping with my goal to use fabric that I had, I really made an effort in finishing the quilt to use up the scraps generated while piecing the top. And I must say (again) there were a tremendous amount of scraps. Although I did not use all the scraps, I used many, and although I did have to order additional solid fabric to complete the back (I was one yard short). So, here is the finished quilt- (I did blog about the individual quilt blocks as I made them in previous posts- if you want totorture inform yourself you can go back and read all about what I was doing in February and March, 2010). I'm linking this quilt over at Sew Cute Tuesday and Fabric Tuesday at Quilt Story.
headband
simple but sweet headband
ruffle headband
Ok- the Quilt. Done, finally- I participated in the Quilter's Block-a-Palooza this past spring. A novelty for me in MANY ways. One, committing to make a quilt, not knowing what the final quilt would look like. Two, keeping with the fast paced 2 block a week schedule. Three, trying to follow directions- I did the first 2 really well. The last, not so much, but, I did have great fun. I made several extra blocks working off the original patterns with minor modifications. Luckily, finishing options were given, (I like options), and keeping with my goal to use fabric that I had, I really made an effort in finishing the quilt to use up the scraps generated while piecing the top. And I must say (again) there were a tremendous amount of scraps. Although I did not use all the scraps, I used many, and although I did have to order additional solid fabric to complete the back (I was one yard short). So, here is the finished quilt- (I did blog about the individual quilt blocks as I made them in previous posts- if you want to
 |
| Top, before the quilting |
 |
| back, front side down, taped to floor |
 |
| back (under), batting and top |
 |
| all those basting pins (I'm too lazy to hand baste, so I prefer pin basting) |
 |
| front- quilted! I used a meandering stitch on the center and a straight stitch around the border. |
 |
| straight quilting stitch in the border. I used a variegated thread on top and a solid on the back |
 |
| Modern back. Kona solid in Paprika, left over 1/2 square triangles, pinwheels and geese |
 |
| left over pinwheel , meandering stitch in a solid color thread on the back |
Friday, May 13, 2011
It's been done, but it's been raining
I am linking up a quilt I finally finished at the Bloggers' Quilt festival at Amy's Creative side. After reading this post, please take
This is a 16th birthday quilt I made for my niece Allee. It is large, 98 x 90 inches (queen size). Allee is a vibrant, creative young lady who designs her own clothes, which she then sews and wears to Italy no less! Bravo Allee. This quilt was designed with her in mind- I did not use a pattern- and I "auditioned" the completed blocks when I put the final top together. I typically sew extra blocks and I always place blocks that did not make in onto the top onto the back, so really, nothing goes unused. I personally take a more-the-merrier philosophy for fabric usage when designing quilt tops and this quilt is no different. There are over 60 different fabrics on the top alone. All fabric came from my stash with the exception of the main backing fabric and the outer border fabric. The quilt is stitched simply using a variegated cotton thread, following the general outlines of the "squares", keeping 1/4 of an inch from the seam lines. The outer sashing is stitched in concentric 1 inch rectangles.


I have one more, yet to be 16, niece, but I have a few years before I have to design and complete her quilt. I have made 3, queen sized quilts so far- 2 will go with their owners to college this fall. It seems like it takes forever to make a quilt, but then again, it seems like only yesterday when they were on their way to kindergarden, new lunch box in hand.
Tuesday, May 10, 2011
Scraps déjà vu
I think scraps reproduce in my sewing room when I am not looking. I thought I used LOTS of scraps when I made many fabric cuff bracelets for a 13th birthday (blogged on May 4th). I was wrong, so, so, wrong- however, there are a few more 13th birthdays that my daughter will be attending so, scraps- here I come.
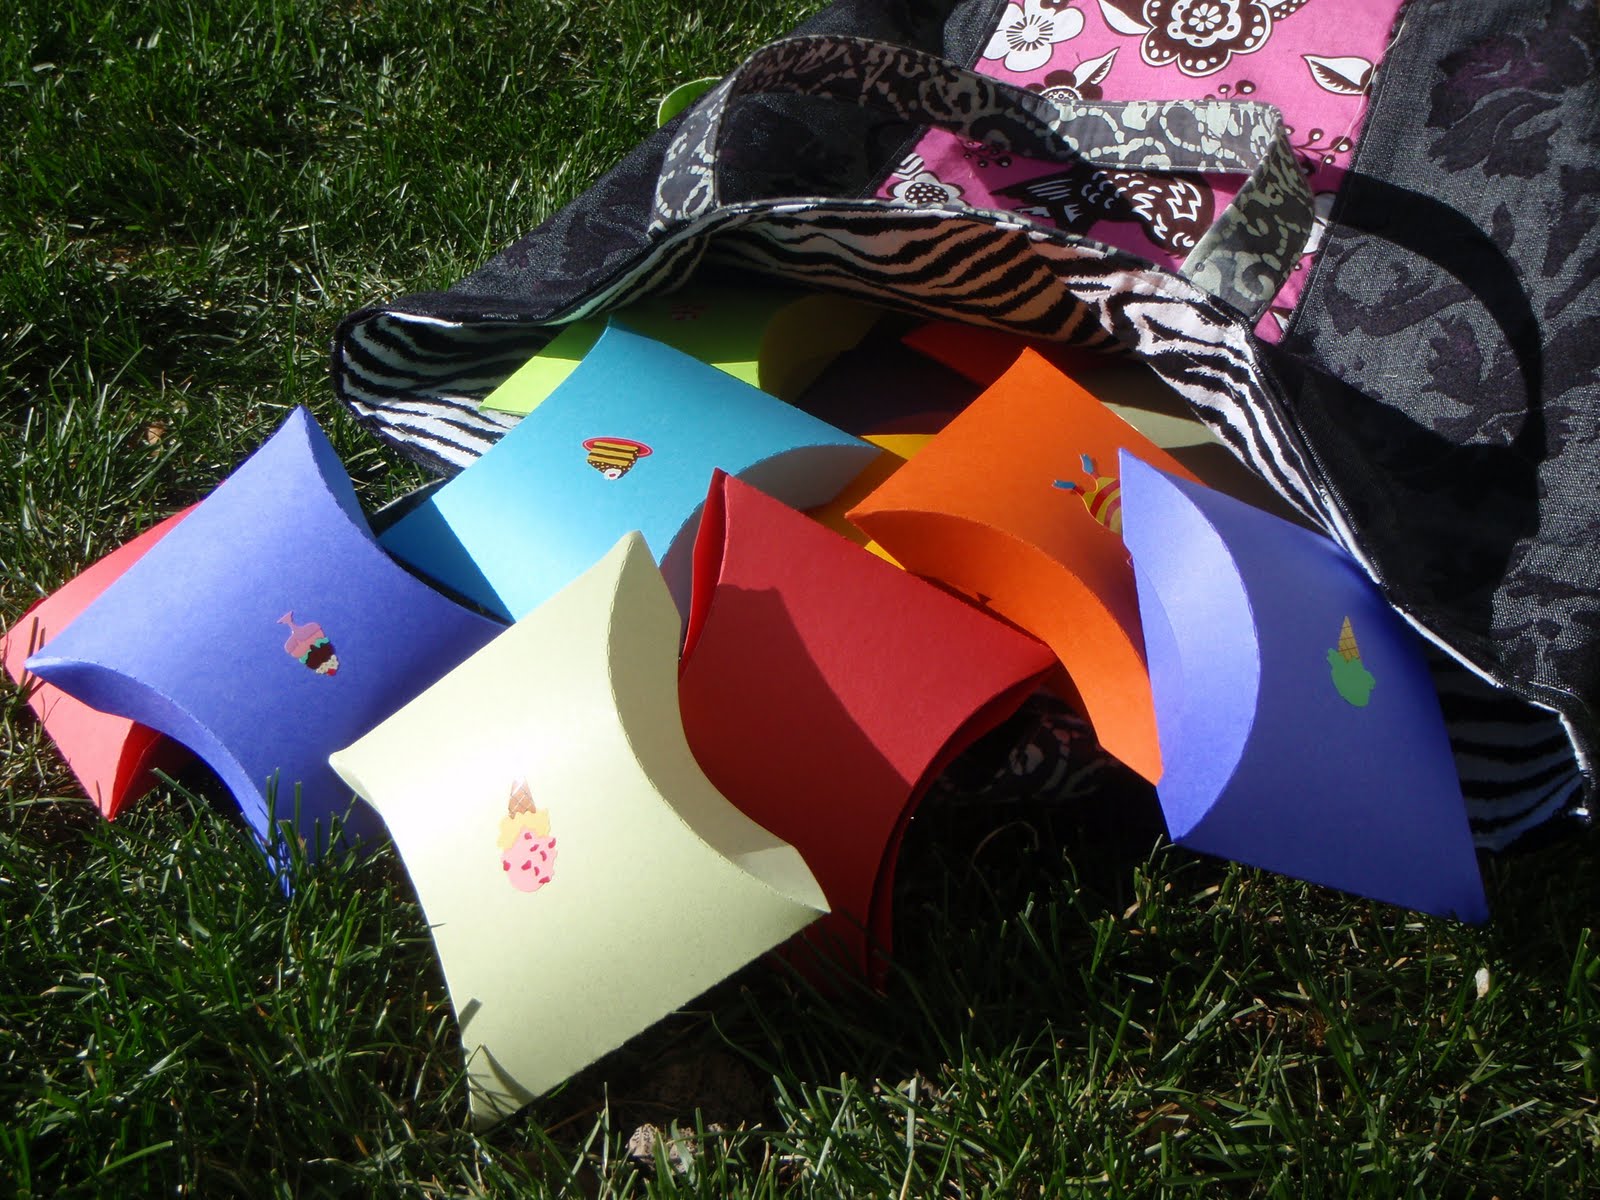
 |
| the scraps that still remain sewn together to make a big piece-o-scrap (don't say that 3 times fast) |
 |
| cutting rectangles of scraps and the lining |
 |
| adding the zipper |
 |
| zippity-do-da |
 |
| peek inside |
 |
| second box bag |
 |
| little felt heart and button adornment |
 |
| 2 box bags completed |
 |
| Finished- the scraps on one run length wise the other cross wise. Both have little ribbon tabs. |
I used as a jumping off point/ and sewing inspiration, directions from Modern Quilt Love's box-pouch-tutorial and modified parts of it to accommodate my use of scraps. It's a great little project that you can finish in an hour or 2 especially if you have all your scraps materials on hand. We plan to fill these with goodies that 13 year old girls would love.
I have a challenge for my small but loyal readership. Leave me a comment about what you would put in these little box bags (they measure 8x3x3), if YOU were giving these to a 13 year old girl as her 13th birthday gift.
BONUS: I will send a little box bag to the person with the best suggestion(s). (You will have to fill it with your own stuff, however). Make sure I can reply to your comment so that I can contact you and let you know how fabulous your suggestions are. If you're feeling generous, tell all your friends to leave some suggestions as well. I look forward to reading what you all come up with. (Suggestions good until May 17, 2011). Thanks for your help!
Wednesday, May 4, 2011
More creative uses for scraps
I have a confession to make- I was going to whip up a few mug rugs as birthday goodies for my daughter's 13th birthday party. So, I got started and even blogged about it- perhaps you remember????? Well, my soon to be 13 year old, told me, she really didn't want a birthday party, huh? (I wanted a birthday party- how could she not?). So, I was sneaky and emailed her friends to join us ( keeping it a secret) for a quick ice cream treat on her birthday right after dinner- or for dinner if it's just soooo busy. I'm thinking, it's a week night, there is a soccer game, then homework- EVERYONE is busy, perhaps a few (5 or so) of her friends will have parents available to drive them and join us, I can have the mug rugs ready to go...... BUT- everyone is coming, 16 girls (yikes). So, change of plans- I saw a really cute idea in ( 101 patchwork projects + quilts- page 25) for (what I think are pretty cute) fabric cuff bracelets. So, this is what happened
 |
| scraps |
 |
| inspiration |
|
| sewing scrap strips to one another |
 |
| stitching fabric to heavy weight interfacing |
 |
| lots of sewn strips (8.5 inches in length) |
 |
| for example |
 |
| done! I zig zagged the edges, put a button hole on one end (boy that was fun 16 times) and a colorful button on the other. I also added a small inspirational charm to each bracelet (like, love, laughter, friendship, etc.) I guess these would also make a cute christmas garland (like the paper chains from our childhoods), just in different colors- and perhaps with velcro instead of buttons. |
 |
| packed up and ready to go.... shhh it's a surprise! |
I will find homes for those mug rugs- I just couldn't get 16 done in that short period of time. (I wish). Happy birthday Remi- xo MOM.
Tuesday, May 3, 2011
Happy Birthdays, Happy Day and Thank you Marjory Peck
It's early May and I have much to be thankful for. First, today is my Mother's Birthday- Happy Birthday MOM!!! I love you. Tomorrow is my daughter's birthday- she will be 13! Happy Birthday Remi, I love you too.
....and yesterday evening I received MY SEWING MACHINE COVER (do you think I'm excited) (Sewn Spaces Swap) from Marjory Peck. I will let the proverbial, a picture is worth a thousand words, do it's magic
....and yesterday evening I received MY SEWING MACHINE COVER (do you think I'm excited) (Sewn Spaces Swap) from Marjory Peck. I will let the proverbial, a picture is worth a thousand words, do it's magic
 |
| cover front(wait there is more) - the tree and raccoon are pieced beautifully, the "sky" quilting is superb . I just love the way the Raccoon is thinking about something... perhaps dinner or a nap?? |
 |
| the back, or the front, gotta love those cute birds and the Autumn tree. Marjory made a completely second pieced scene on the back/front of my sewing machine cover- So, I have birds and a raccoon. And blue birds to boot. |
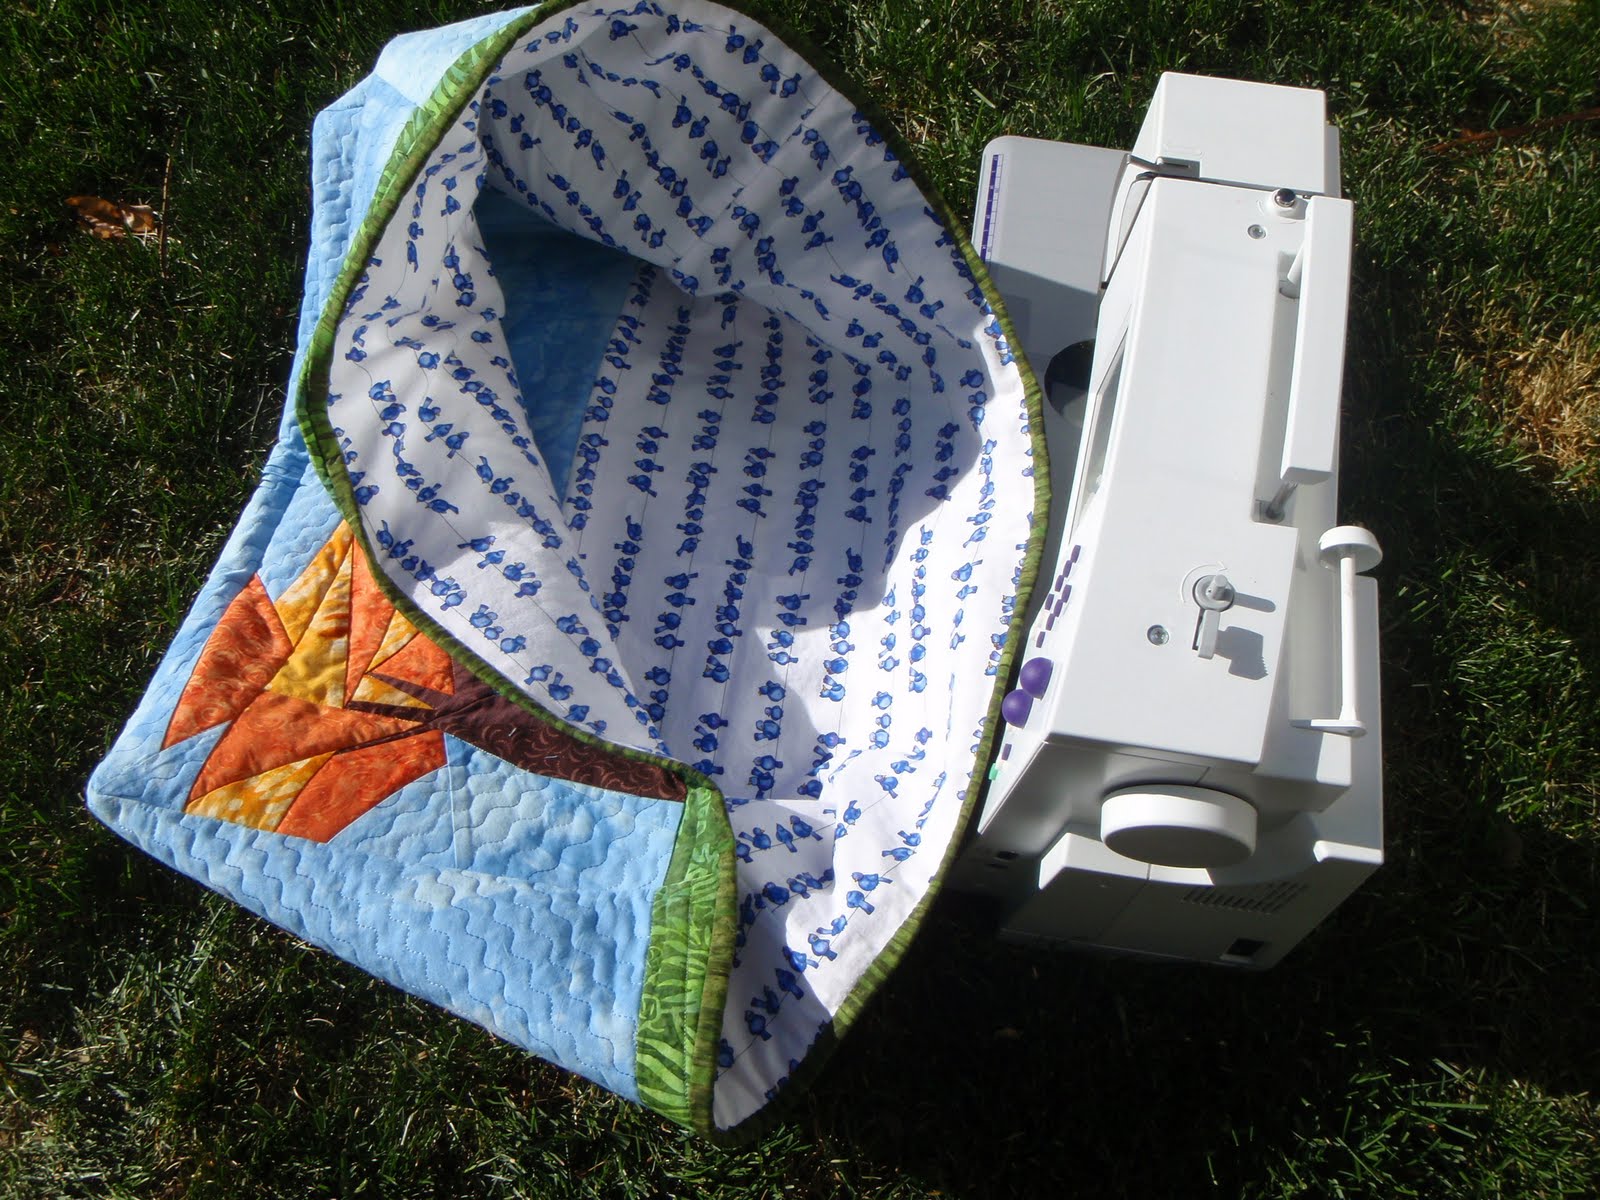 |
| the lining |
 |
| closer of the lining- such cute little birds gossiping on a wire |
 |
| a little raccoon charm for my scissors- hope your drooling over that tonal wavy quilting- it's really amazing |
 |
| a pin-cushion from the charming lining fabric- so sweet |
Thank you Marjory Peck! It is beautiful and will be treasured.
Subscribe to:
Posts (Atom)