Friday, April 29, 2011

I'd be terrible at playing cards

Well, it's Friday and I did get quite a bit done this week. I sent off my finished Hands-2-Help Charity Quilt to Judi at Green Fairy Quilts. I finished my Goodie Bag swap Bag and all the little extras that will go into the bag. I sewed 2 Mug Rug flags for my daughters History class, and finished my Scrappy Mug Rug swap Mug Rug (sounds repetitious). Here is my "why I'd be a terrible card player" problem. Both of my secret partners for the above mentioned swaps had very specific, almost unique "likes" for their swaps. I'm afraid if I post photo's as a sneak peek they will know IMMEDIATELY that I am their "no longer" secret partner. So, I'll give you sneak peeks here. Unless they are visiting blogs of everyone who signed up for the swap I don't think they figure it out.

likes: "practical", dark (black), red and white. Needs a bigger bag to carry stuff.

long straps

likes hexies

lots of interior pockets, one with a zipper (interior) and zippered top (outside)

for me it's all about the finishing details in unexpected places- button "feet" and hidden hexies

and for the Scrappy Mug Rug Swap

My partner likes: linen, polka dots, bright modern florals

a treat to go with the mug rug (2, to-go rugs , one for each of her  little boys)

back-o'-the rugs: hopefully you can see the boy karma happening. Also, my partner likes fish, and zoo animals

close-up of the back- hot beverage cup and the little fish

front with pieced circle

getting closer.......

closest! I really hopes she likes it.

So, I'll post the pictures here and as the swaps get closer to the finish line, perhaps I'll put my poker face on and play the wild cards.


Tuesday, April 26, 2011

Hands-2-Help Charity Quilt Challenge

You have probably seen (all 32 of you) the button on my side bar. The bright happy yellow/multicolored Hands-2-Help Charity Quilt Challenge. I volunteered to make a quilt for someone in need in Romania. All the quilting volunteers were assigned a partner who mailed them 2 yards of fabric. You then took that 2 yards, added some more and make a quilt (sounds crazy simple enough). The design and execution is up to the quilter (that would be me). So, let me tell you something about this whole quilt making process, for me that is......
1. No amount of arm twisting could ever make me make a quilt if I didn't like the fabric and design. There is just too much time (and money) that goes into these to not enjoy the process.
2. That being said, I usually design my own patterns and use what ever fabrics I think are necessary.
3. I have never made a quilt from a single "line" of fabric. To me it's a bit like Albums of old (remember vinyl). There were maybe 1 or 2 songs that you really wanted and the rest- not so much. So, typically I pick the ones I like and leave the rest.
4. I have NEVER had anyone send me fabric to make a quilt for someone I didn't know.
(So, you are probably wondering what exactly was I thinking- or not thinking).
5. That being said, I also decided this year would be a good year to stretch my comfort zone. To try some new things- this is what I got myself into and I can tell you, honestly, the Challenge in the name is aptly put.

My lovely partner send me 2 yards (4- 1/2 yard pieces of differing hues) of purple. I have exactly 3-4 other fabrics in my collection that are purple (sum total perhaps, 4 fat quarters). I have YARDS of blues and greens, pinks and oranges but very little purple. BUT, you also have to be brave to send purple. It's a royal color, regal and historically very important. So, I embraced the purple and thought, what to put with it. Salvation came in a pattern- what you say- from Stitch Magazine called Dare-to-be-different. Isn't that what purple essentially is, daring, very different??? This was a sign. I knew it- I had purple and I had a pattern.  I went to the fabric store and pulled from my collection and this is what I got (start to finish- fabric selection, layout, pinning and completion all in pictures)

the 4 purples from my partner on the right, my additions, the green (Alexander Henry's Farmdale) and selections from my stash and shopping outing on the left.

fabric and pattern, fabric cut and stacked in the light, medium and dark piles

testing the layout

pin basting

Front of quilt

back of quilt- pieced binding really stands out along bottom edge

I did several additional things I have never done before in this quilt- why not, I was on a roll and feeling comfortable with the way I had already stretched myself.
1.  I pieced the binding with the leftover fabric scraps and did not (for the first time) cut the binding on the bias. I wanted to use up all the scraps, keeping the "boxy" feel-  and I think it really compliments the quilt. 
I also pieced the back (done that before)- but I am really happy with the layout both front and back. (I did not follow the pattern for the back of the quilt- no surprise there). 
The quilt is 72 x 56 inches. Bigger that I was planning, but again, using all the material I purchased and was given. It's stipple quilted all over in a variegated green thread. 

I would like to really thank my partner for giving me this challenge. I'm thinking I perhaps haven't given purple the respect it is due. 

Thank you Judi
Thank you Sarah
and mainly, Thank you Kari, without those purples, this quilt and it's journey from inception to completion would never had happened. 

Friday, April 22, 2011

Phew, perpetual motion and now some rest????

I think I'm in for a busy several weeks  months. I just finished with my Sewn Spaces Swap and sent, and my partner received, (and really liked) her sewing machine cover. It was for Marjory Peck at Pecks Pieces. She has christened it Stephanie's Garden and she added the 2 little flower pins I also made for her to the cover which I think is brilliant. I was thinking she would wear them, but as long as something is wearing them, I am good! Head on over to her blog and see what she said. You can even see my cover in it's new home.  With all that behind me and with another swap staring me in the face, I began my Goodie Bag Swap. It's a bag (the Bag part of the swap name) for a secret partner (that you get to find cool things about) and a "zip-lock" bag of fabric scraps (the Goodie part of the Swap name). You sign up for your bag "level", I chose the "expert" level (anyone surprised??? anyone???) and off you go. I couldn't find "the bag" I had in mind, so, I made my life more difficult, made my own pattern. This is what I have to show for it so far.

Goodie Bag Swap in progress

There will be more later on this project- that's all you get for now. And in the midst of it all, my almost 13 year old, who sews herself, who I dragged along to my Quilting Guild Meeting last Saturday, asked me to make a Mug Rug for her. I guess I've been talking up my Mug Rug from Susan Phillips, and using it every day. So, I dropped everything nicely cleared everything off my sewing table, and, because it's almost her birthday, and, because she likes cupcakes, made her this.......


The stitching says, "You are  my favorite cupcake"

And then I started thinking, if we do something for her birthday, it would be nice to have" a little something" for the young ladies that attend- I started making these.


I mean if my daughter liked her Mug Rug, her friends will probably like one too..... all this in the midst of receiving the fabric from my Hands2Help Charity Quilt Challenge partner.....

The fabric from my partner is on the right (4 purples of different hues). I added the left stack of fabric and the green Farmdale by Alexander Henry


I chose the Dare-to-be-Different Quilt Pattern by Karrie Winters, featured in the current edition of Stitch Magazine, and I started by cutting all the fabric into strips (2.5 inches wide) with the following changes: (left to right)
1. I kept the Deep purples, deep purple
2. Mid tone purples are also the same
3. Pale purples are now pale blues
4. The dare to be Different Red is Turquoise
5. The pale grey background is Alexander Henry's Farmdale in a lovely green print

This quilt will be going to Romania and given I cannot keep light colored anything clean, I figured that having a darker color in the background would be prudent. I will strip piece the back in mostly solids using the turquoise again, a dark solid purple and whatever is left from the Farmdale. 
I did also have a bit of time to post some things I have been working on at Jenna's Sew Happy Geek blog and she was nice enough to recognize me (again)- Jenna- thanks!! Guess what she featured (I'll give you a hint- it's featured prominently in this post)........ some of the Mug Rugs I've been working on. Fancy THAT!!!!! 
Off to sew my projects in waiting. Wish me luck.

Tuesday, April 19, 2011

Two for Tuesday

I'm linking up, again, (it's addicting) at Sew Cute Tuesday @ The Creative Itch and Fabric Tuesday @ Quilt Story. LOOK over in my side bar for the link buttons- click on them and then go see all the creative goodness out there. While you're there, grab their buttons and put them on your blog, (I know you want to), and then next Tuesday, get your act in gear and put something out there. It's all good!!! (my Tuesday posted goodies are "Mug Rugs Galore" featured in my Thank You Susan Phillips post from Sunday). XO-

Sunday, April 17, 2011

Thank you Susan Phillips

Yesterday my quilt guild got together for our monthly "meet and sew" an meeting and then an afternoon of sewing. Unfortunately, I couldn't stay for the sew part, but at the meeting we exchanged our mug rugs. I received mine from Susan Phillips. It's beautiful-


It came with a really beautiful, simple red mug that I will use. I actually used it this morning, but took the photo before the coffee and toast. Made breakfast that much more pleasant. 

I made my exchange mug rug for Jody Wyss

My inspiration came from the fact that Jody is a retired teacher. The paper and pencil (#2 please) is for writing down inspiration when one is quietly sipping hot coco


On the topic of Mug Rugs, my partner from the Sew Happy Geek Mug Rug Swap, Lora Felts, and I will be exchanging 2 mug rugs. I have already sent her one

front- she likes pink (7" x 10")

back- I just love the birds
..... and for mug rug No.2, something a bit more down to earth and not so girly (Lora is getting married soon and perhaps her future husband might like to use a mug rug too)

Mug Rug No. 2 (6" x 9) front

back

Looking at all these and at all the fun Mug Rugs out there, it's inspiration galore. If you have made a Mug Rug lately, let me know. Leave me a comment with a link and I'll go take a look.

Saturday, April 16, 2011

Belated Thank you! and I'm passing on the love-

Kiera at it's sew kiki has passed on some blog love and I, in turn am doing the same- She was kind enough to mention my blog in a post on her blog (you're all following this, I'm sure) and it's an award, she received from Sew Happy Geek, Jenna Excell.   It's a recognition of bloggers that are working hard, but have not (yet) achieved the uber-blogger status with a gazillion followers (oh, don't I wish). The Liebster Blog Love award goes to bloggers with 300 or less followers. Enough followers to be comfortable bloggers but not so many that this would be just a flash in the pan. The whole idea is to recognize 3 cool bloggers and to follow them ( I definitely did). They in turn, link back to this post and follow me (hopefully- fingers crossed). The 3 bloggers then find 3 more bloggers and so on and so on.


So, here is my selection for some Liebster Blog Love
1. Dee at Dee's Doodles. She had some photos of a beautiful Sweet Pea block on Flickr that just caught my eye. You should go see that and all the other fun things she is up to.
2. Ali at a2(w) (a squared W). (I can't get the 2 to square up). She's a math teacher and a quilter and I am her 100th follower- there has to be some magic going on there.
3. Katie Q at Salt Marsh Path. She and I are both doing the Hands2Help Charity Quilt Challenge. She also was the winner of the beautiful jelly rolls that I covet! Go over and show her some blog love.

And, please go follow Kiera and Jenna (if you don't already)- I promise you will not be disappointed. Hopefully if your followers have read this far, they will click on some of the above blogs and follow and next thing you know.......

So, happy spring everyone. Go have fun outside or inside. Or go sew outside (I've always wanted to do that).

My to-do list isn't getting to-done.

Well, I know there are things I HAVE to do, like acknowledging a kindness and passing it on, Kiera, I will do that, I'm working on it, I promise.
Quickly, I'm posting my FNSI project- it's taken my FOR EVAH! (pardon my french) and it's soooo close to being done. It's for my niece and it's a queen sized quilt. All I have to do (like I haven't heard that before) is hand sew the binding onto the back of the quilt. Easy peasy, right?


Tomorrow I will work on my thank you's and pass on some blog love. Thanks to all who have left comments on my WIP Wednesday post. 


Wednesday, April 13, 2011

WIP Wednesday

I'm putting this out there, because if I don't it might actually languish, like the other quilt, 3/4 done...... I'm just not into the quilting part of quilting. I like the brainstorming and the color selection and the piecing but the quilting, not so much. Anyway, this is the top of the quilt I ended up with after the Block-a-palooza quilt along. I promise to finish it, eventually!!!!! I'm linking this to the WIP Wednesday blog. Check it out here.


Tuesday, April 12, 2011

New winners of the Stylish Blogger award

Go visit Kelly over at  blue bird sews and see all the new Stylish Bloggers. Click on their blogs and give them a big old hug. While you are there follow them, they'd like that. See what cool things they have been up too. I bet if you follow them, they'll follow you-  it's blog follow the leader (or follow the blogger). Follow Kelly too and read her post about 7 things you never knew..... Each of the recipients of the award will disclose things as well. I've learned all kinds of cool things about these really neat women who are really creating beautiful things. In case you missed it, you can link here and see what I said.

It's Tuesday- time to show off

I'm linking up my Clothes Pin keeper tutorial at Sew Cute Tuesday @ the Creative Itch and Fabric Tuesday @ Quiltstory. Please go click on their buttons on my right side bar and then come on back and try the tutorial. It's spring- time to get out the clothes line! Get going!!

Sunday, April 10, 2011

Clothes pin keeper tutorial


Clothes pin keeper ready to go!
My first tutorial- hope you like it. It's that time of the year around here where you can start hanging clothes out side. Nothing like it, that smell, the light breezyness- our ancestors were really onto something. My tutorial is inspired by those little chalk bags rock climbers use. So, gather these supplies and lets get going.


You will need some fabric (your choice of course) for the outside, and lining
Climbing rope or clothes line (cotton, not plastic coated wire)
Fusible fleece 1/2 yard should make you at least 2 clothes pin keepers
Something to clip your clothes line keeper to the clothes line

I chose the following fabrics
Night Sky (Tina Givens)- aqua
Ta Dot (Michael Miller)-yellow
Fresh Flowers (Deb Strain)-orange
Belle (Amy Butler)-lining- shown on top most photo, far right

Cut your climbing rope to 18", singe ends to keep from unraveling and sew ends together to form a circle. I highly suggest you do this by hand.


Cut your fusible fleece and lining material to 20 x 10.5 inches. Fuse lining to fusible side of the fleece.

Use your rope circle to trace the template for the bottom like this


I added about 1/2 inch extra for the seam allowance.
Use your template to cut fleece and lining, fuse both together

round base and sides with lining fused to fleece

Now, start cutting into your fabric, strips 20 inches in length. The width you can choose based on your fabric and how you want your final clothes pin keeper to look. You will use a quilt as you go method to attach these strips to the fleece.


Placing right sides together and using a 1/4 inch seam stitch fabric strips to fleece.

When done the outside and bottom can look like this:

Main portion of clothes pin keeper


bottom using left-overs


Zig zag all raw edges. Now it's time to assemble the clothes pin keeper. With right sides facing and lining on the outside, sew the side seam with a 1/4" seam. Pin and sew bottom to bag. Like this:


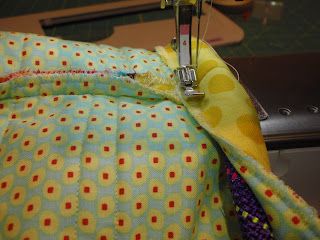
Now here is the fun part. Using a zipper foot, and with your clothes pin keeper still inside out, slide your circle of climbing rope onto the outside of the bag and move it towards the top. Fold the top over the rope until you have enough overlap to sew your fabric in place encasing the climbing rope. (I used a purple climbing rope so you could see it better).


Continue all the way around encasing the rope, use a 1/4 inch seam- or width of your zipper foot which ever is easier. Almost done!

Here I am waiting for my loop so I can be hung.


Use some of the fabric you have chosen and cut a piece 6 inches by 3 inches. Iron wrong sides together lengthwise. Open strip and fold each side into the center crease. Iron and then fold again. Stitch the edges closed. Fold in half long ways,  folding under the raw edges and stitch to your clothes pin keeper just to the side of the side seam (it might be too much fabric to try and attach right over the side seam, but the final placement it up to you). I like to secure the loop at the bottom and then again just below where the seam for encasing the rope (keeps it from flopping too much). (You can also use ribbon or nylon webbing if you don't want to use a fabric loop- again this is a personal design decision).


Attach a clip/ carabiner so you can attach your clothes pin keeper to the clothes line. (See top photo in this post). (You can get these carabiners at Michaels and Hobby Lobby- or if you are like me, you might already have a few at home).

Well, I hope you enjoyed this tutorial. I'm thinking this might also might make a really cute catch-all mini bucket, or a thread/ scraps holder, or a mini trash can, or well, you catch my meaning. 
If you try this tutorial and come up with an alternative use for this, let me know. Send me a photo or your finished project or a link to your Flickr photo URL or your blog post and I'll include it in a future post. Mostly- Have fun!