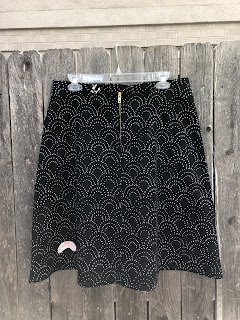
I've got to meet some really interesting people earlier this year and it's my pleasure to be able to talk about and create with a new fabric line by
Simone Bradford call
"On Your Mark", produced by Paintbrush Studio Fabrics. Simone is a talented quilter and seamstress and we got to meet in person at Quiltcon where she was sporting some really fun clothing and accessories made with her new fabric line.
Because I was admiring some of the clothing Simone and the designers at
Indigo Junction made with her fabric, and because I'm making a bunch of clothes these days, I thought I'd go that route, making myself something fun for spring, with some design twists that could be replicated at home, should anyone desire to make a fun skirt for themselves.
I started with a self-drafted A-line skirt pattern and a few yards of On Your Mark in this color way.
The skirt is a classic silhouette, in a knee skimming length, perfect for spring in Colorado, when the weather can be sandals one day and boots the next.
Using the repetitive design in the background fabric as an element, I cut into the fabric adding small snippets of contrasting colors from Simone's line as focal points. I placed these fabrics on both the front and the back, because it's my personal opinion that your garment should look good coming and going. Because I wanted the placement to be specific, I didn't add the contrasting fabric until after the skirt was finished, but depending on how comfortable you are with this technique (which is prepped like the initial steps in a welted pocket, but curved), you certainly could try first and then use that modified fabric to construct your garment. As a design alternative, these shapes could be added as an appliqué feature, but my preference in garments is a more tailored look, hence the use of an inset element instead of an appliquéd one.
If you want to try my method then do this:
1. Using the fabric pattern as your guide, trace the cut line then cut along this line following the design along the curve.
2. Stop 1/2" from the ends and clip at a 45 degree angle to where you want your curve to end (again, I used the pattern on the fabric as my guide).
3. Clip curves and corners and iron the fabric to the back.
I use a little bit of glue to hold those tiny fabric snips in place, but you could also use starch.
Ironing the concave curve is easier than ironing the convex curve. Take your time and overlap the clipped corners to get a nice shape.
4. The contrasting colored fabric of your choice is then added to the back, glue-basted to keep things from moving.
5. Stitch in place via a very skinny seam on the front of the fabric. Using complimentary thread makes this step almost invisible.
6. The stitch line is hard to see because the thread color was chosen to purposely disguise it.
 |
| These insets are small, about 2.5 inches across and about 1/2" in width. |
I up-cycled a old button in black and white plaid for the back waistband
and used an exposed metal zipper that stands out just the right amount.
Hiding, but equally as fun is a right sided (I'm right handed) pocket hidden in the side seam allowance. The pocket is lined in a contrasting fabric (see below for the fabric pattern numbers) and stay stitched to the skirt front panel to keep it from moving without adding bulk to the design when in use.
 |
You can see the right sided pocket in contrasting fabric from the side.
All the fabrics were pre-washed to prevent bleeding and for shrinkage control.
|
You could easily choose any of Simone's prints for your creation, making it personal to suit your wardrobe and the colors you prefer. Each contrasting inset uses only snippets of fabric, so you don't add much to the overall cost by purchasing small amounts, or if your design dictates and you want to be economical, using the same fabric for all the insets.
If you want to try something similar, I used the following fabrics from the On Your Mark line in this project based on my self drafted pattern:
120-10771 (1.5 yards, skirt)
120-10782 (FQ, skirt pocket)
120-10762/10741/10742/10762 (charm square each, skirt insets)
In addition I used a 7" metal zipper and a up-cycled button, complimentary thread in black.
Depending on the pattern you choose,
you should follow the recommendations and yardage on the back side of your pattern envelope for the best possible outcome.
What I love most about this fabric is it's versatility. You know you have a great line when you can make equally lovely quilted items and clothing!
Paintbrush Studios is generously donating a FQ bundle of some of Simone's On Your Mark line to each blogger to give away. Leave me a comment here, or on my IG feed about this project and I will pick one lucky winner at the completion of the blog hop! Tell me what you would make with Simone's fabulous fabric - "On Your Mark", get set GO! (leave a comment!!).
Here are the other makers. Go visit them and enter their giveaways to increase your chances of winning.
Thursday, April 19: ME


